Show/hide
Clear | Results
Read all
Print all
Download PDF
1. Introduction Go
Welcome to the administrator's user manual for ValetManager from Valet Manager Ltd. Go
Although the dashboard for valeters and sales users is designed to be very easy for them to use, your admin dashboard allows you access to the many options and settings that make their lives easy. Go
To get the best out of your subscription to ValetManager, please take time to review at least the key concepts and the sections helping you to set up the system for the first time. Go
Please be aware that this manual may describe features not supported in your subscription, but feel free to contact us to have those added. Go
2. Key concepts Go
This section explores the key concepts you need to understand to help you get the most out of ValetManager. Please be aware that this section may be describing features not present in your account. Please contact us if you'd like to find out more about these. Go
Also in this section:
User typesDealer group structure
Jobs and job tasks
Key control
Job acceptance
Events and event jobs
Test orders
QC checks
Products, categories and stock locations
Orders and order lines
Invoices
Payments
Privacy
2.1. User types Go
The system has many built-in user types with specific sets of permissions. These typically match the roles and responsibilities of users in larger dealer groups and valeting companies. You don't have to use all of them, but it's useful to know that you can. Go
2.2. Dealer group structure Go
The system allows you to set up and manage related client sites into a heirarchy of dealer groups which each have dealerships which each have departments. You can set up structures as simple as a stand-alone independent dealership right through to a national or PLC. Go
2.3. Jobs and job tasks Go
Each valeting request added to the system is called a job. A job has things like make, model, colour, reg or VIN. Each job also needs one or more job task. These are typically activities such as a 'new car ful valet' or 'pain treatment'. Job tasks work with job task codes and task prices to allow you to manage pricing and invoicing. Go
2.4. Key control Go
As an option for a job, you can set up a department or a task code to require key control. The feature, if enabled, allows your valeters to confirm that a vehicle key has been passed back to the relevant sales department. Go
2.5. Job acceptance Go
As an option for a job you can configure a department to require a sales user to confirm they are happy with the quality of the work. They can either accept or decline the job and this is fed back to your nominated user if necessary. Go
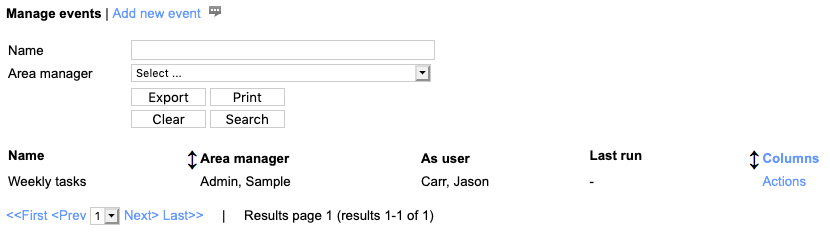
2.6. Events and event jobs Go
If you have routine jobs that are required week after week, such as site maintenance or pitch cleaning every other day, you can set up events which control event jobs which in turn add jobs into the system for your valeters to do. You or your area manager don't have to remember the details every time because the event job acts as a template to create them correctly. Go
2.7. Test orders Go
You can create dummy orders in the system to test for the quality and accuracy of your process - for example to ensure a valeter is not claiming for jobs that he cannot possibly do. Go
2.8. QC checks Go
You can manage routine or ad hoc quality control or health and safety checks through the system in order to allow staff, valeters or clients to provide feedback. Checks by valeters can be used to authorise additional payments if you want or an area manager might survey a job which has beeb rejected by the client. Go
2.9. Products, categories and stock locations Go
If you want to allow valeters to manage their own chemical and equipment stock you can set the system up to allow them to place orders for what they need and these to then be picked from stock and delivered to the valet bay. Go
2.10. Orders and order lines Go
If you have products with categories and stock locations set up in the system, your valeters can place orders for them which appear in the system as orders with order lines. Orders can be picked and dispatched then checked-in at the valet bay to allow full control of supplies usage and costs. Go
2.11. Invoices Go
The system has two types of invoice - firstly, self-invoices from your valeters to you so they can be paid and then secondly, invoice advices for your accounts department to turn into formal invoices for sending to the client. Go
2.12. Payments Go
Your subscription to ValetManager can operate either on credit card payments or monthly invoices. If you normally pay by credit card you can see your payment history within your logged-in account. Go
2.13. Privacy Go
ValetManager Ltd, maintains secure servers and keeps your company's data private to you and your users. When users such as sales or valeters log in to their dashboards they can review our privacy agreement and their own privacy settings. Go
3. Processes supported in ValetManager Go
This section describes some of the main processes implemented in ValetManager so you can see how to relate it to your business. Go
Also in this section:
Job ordering and task approvalDuplicate job checking
Templated order events
Client quality feedback
Vehicle, bay and company vehicle quality or health and safety checks
Security orders
Stock ordering and delivery
Valeter clock in/out
Valeter self invoicing
Dealership invoicing
Valeter HR information management
Sales and valeter access to a document repository
3.1. Job ordering and task approval Go
The main process and purpose of ValetManager is to accept jobs from sales users and then for valeters to do the jobs. Normally a sales user adds a job and the tasks required. However, a valeter can also add jobs or tasks if necessary and then these would need approval from a sales user before they could be invoiced by either the valeter or the valeting company. This allows the process to be flexible but to minimise disputes. Go
3.2. Duplicate job checking Go
Standard behaviour of the system is to look for jobs to the same vehicle registration within the past 30 days and warn about what has already been done to reduce the risk of sales ordering a duplicate job. This behaviour has quite some flexibility to allow some slack in the checks and to not prevent duplicates totally for all users. Go
3.3. Templated order events Go
These are a convenient way to set up repeated jobs such as site maintenance or showroom cleaning and can relate to a specific vehicle or a general job. Go
3.4. Client quality feedback Go
If you have support for QC forms, you can have a client quality feedback form which can be sent to selected sales users who have the option of completing it early each month. There is also an option for constant feedback whereby the same QC form is available all the time to be filled-in and sent whenever the need is felt. Go
3.5. Vehicle, bay and company vehicle quality or health and safety checks Go
If you have support for QC forms, you can have health and safety or quality forms for valet bays, company vehicles and job performance. Some of these can be completed by valeters, some by area supervisors, some by team leaders and some by area managers. Some can be filled-in at will, and others are filled in at the end of a week and can permit a bonus payment to a valeter who completed it. Go
3.6. Security orders Go
If you have this feature, you can place agreed test orders into the system. You can use this process for whatever kind of check you want, for example, valeter honesty or job quality. Go
3.7. Stock ordering and delivery Go
You can use the system to manage consumables and equipment so that valeters can place orders which can then be picked from a stock location and sent to the valet bay where they can then be checked in. Doing this you can view or control usage and spend and also streamline the process for ordering, perhaps taking away the hit-and-miss of a phone call to the area manager. Go
3.8. Valeter clock in/out Go
ValetManager supports processes for unit-priced jobs and also hourly rate valeters. For these, they can clock-in and clock-out of the system which records timesheet sessions for them. These normally get approved by a sales user and can then be included in a valeter self invoice either directly by the valeter or automatically at certain times of the week Go
3.9. Valeter self invoicing Go
ValetManager allows valeters to raise their own self invoices and have them sent directly to your accounts email addresses for review and payment. At certain times of the week this can also be automated or you can force the invoices yourself if you'd prefer the valeters to not do so for themselves. Go
The accuracy of the self invoice depends on prices and costs set up in the system. Go
3.10. Dealership invoicing Go
You can use ValetManager to generate invoice advices for formal invoices to your dealer groups. Go
Invoices are producted per-department and include a summary as well as a full-details backing sheet. Go
3.11. Valeter HR information management Go
ValetManager supports the collection and use of most common HR information such as driver's license, right to work, next of kin. If you have this feature in your subscription your area managers can help valeters to complete contracts and training records online and your HR manager can then approve details once provided. Go
3.12. Sales and valeter access to a document repository Go
As an admin user for your valeting company you can use the system to publish documents such as work instructions, health and safety, pricing agreements. You can publish them for access by any user in any role, or restrict them right down to a specific department. Go
4. Setting up your system for the first time Go
The first time you log-in as admin with a brand new account, you will normally see some brief notes about what you need to do to get going. If you have used our setup service we will have done this step for you, but it's good to see what you would have to do so you can repeat it for additional dealer groups, etc. Go
Your dashboard will look a bit like this: Go

The most efficient way to set up your system is to follow these steps in this order: Go
- Go
- Add the task codes you will use in jobs across all your clients
- Add your first dealer group
- Add the first dealership to this dealer group
- Add the first department to this dealership
- Do some tests
Also in this section:
Adding your task codesAdding your first dealer group
Adding your first dealership
Adding your first department
Testing what you've just done
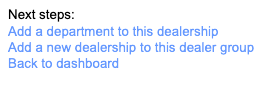
Next steps
4.1. Adding your task codes Go
When sales users raise valeting jobs they will typically request one or more task codes they need your valeters to do. You will need to define these task codes and their prices before anyone can raise any jobs. First of all we will create the codes - we'll worry about the prices a bit later. Go
From your dashboard shown in the previous section, click th 'Click here to add your task codes' link. This will take you to a screen much like the below. Go

This screen allows you to enter eacch of your task codes all at once, specifiying the short-hand code you use, the longer textual description and then which group (if any) the code relates to. A typical short-hand code might be 'NCFV' which might be accompanies with a textual description of 'New car full valet'. The system attempts to relate vehicles in jobs with a category, so Small, Medium and Large might relate to a specific model of vehicle. AT first it's best to set no group for your codes as they can be set later if you find you need to group them. Go
Use the '+' and '-' buttons at the end of a row in the grid to add a new row to take a new code, or to remove the row you're clicking in. Go
When you are happy with the codes you've defined, click 'Save'. Go
Once you've saved your codes you can return to the dashboard and set up your first dealer group. Go
Note that you can edit your task codes as well as add new ones and remove existing ones from the left-hand menu 'Valeting | Task codes'. Go

4.2. Adding your first dealer group Go
Once you have your main task codes in the system you are ready to add your first dealer group and it's associated users, dealerships and departments with their task prices. Go
To add your first dealergroup go to your dashboard and click the 'Click here to add your first dealer group' link. Go
This will take you to a screen where you can enter the main details of the head office of the dealer group: Go
Here you will see fauly simple fields for the name and address of the daler group head office. The mandatory ones have a prompt inside them of what you need to enter. Go
Once you've filled these in, click 'Next step'. Go
Here you will enter the name and email address details of senior 'sales' users. Go
These users are typically senior staff who operate across the whole dealer group, for example, the director of new car sales or the finance director. Go
These users get a log-in that allows them to select any department at any dealership in their dealer group to look at jobs, download spend reports and so on. Go
For each user you need, enter their first name, surname and email address. You can add another row into the grid with the '+' button at the end of the last one in the grid, and you can delete any row using the '-' button at its end. Any users you add will be give a password to suit their email address, so in the sample below, James Smith will have a default password of 'jsmith'. Go
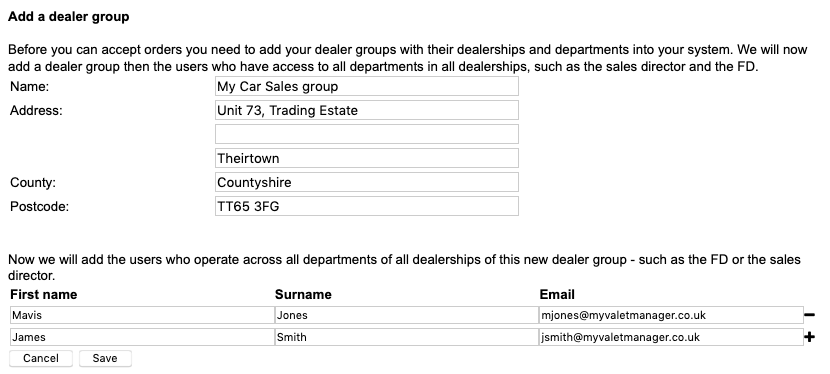
If there are no users at this level, just click 'Save'. Go
Once you have created the top-level of this new dealer group you should create the first dealership for this dealer group. There's a link for this once you've saved the dealer group, 'Add a dealership to this dealergroup'. Go
4.3. Adding your first dealership Go
Having created a dealergroup, you can add a dealership to it using this screen: Go

Here the system makes some assumption about the final name of the dealership anda how it relates to the name of the dealer group, but you can change this later. It's just to help you have systematic names for things in the system. Fill in the blanks (the mandatory ones show you what they expect) and click 'Save'. Go
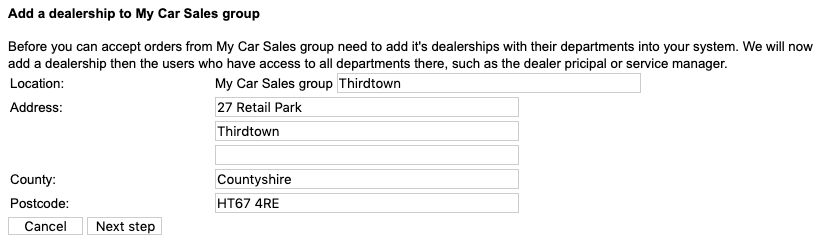
As with adding a dealeregroup, you can now also create user accounts for people who work across the dealershop and maybe need access to all the departments you're about to set up. These might be, for example, the dealer principal, or a sales admin user who needs to look at New, Used and Service. Go

These users will be set with the left-hand part of their email address being also used as their password. We tell you this now because you won't have access to their password once you've created their accounts. Go
After you've created the senior sales users in the dealership the system assumes there's one valet bay at this dealership and you can enter the details of your valeters who work there. Go
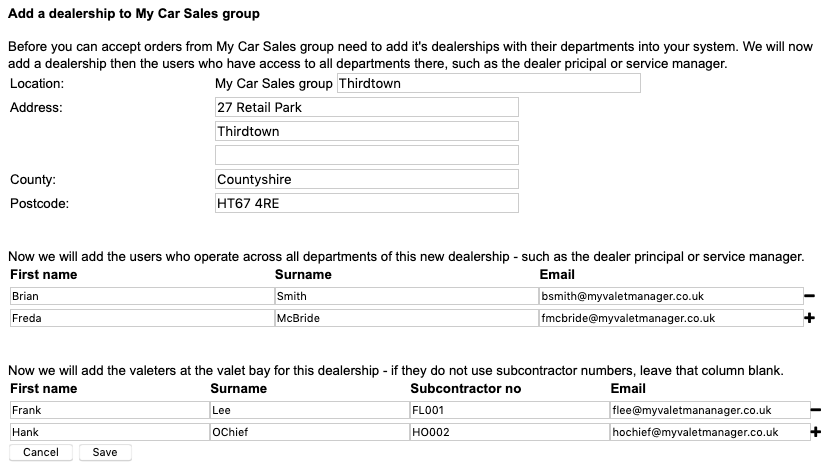
This asks for thir first name, surname and email address as you've seen in other areas, but this also asks for their subcontractor number. If you operate with valeters who are self-employed subcontractors you probably already have subcontractor numbers for them, so add them here. You don't need them, but if you have valeters who work across several sites it's easier to get this information in now. Go
You are now ready to add a department to this dealership - use the link at the bottom of the Add dealership wizard. Go
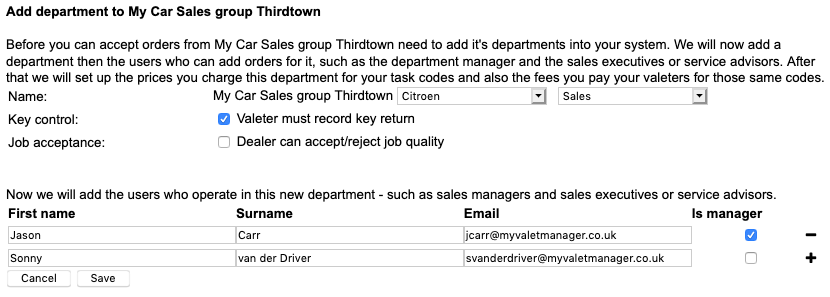
4.4. Adding your first department Go
Finally, once you have your first dealer group and its first dealership you can add the first department to it. There's a link to do this at the bottom of the end of the Add dealership wizard. Go
Here you can name the department in a systematic way by selecting the franchise and the type of department. Although we use those in specific ways by default, you can easily change them later for any reason. Go

You can also select whether optional features such as key control or job acceptance apply to this department (subject to these being included in your subscription). Go
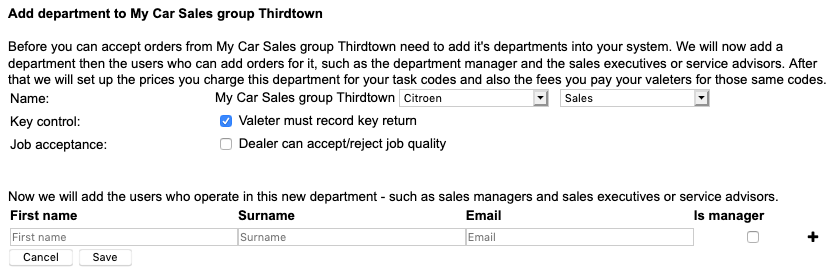
You can then start to add the sales users in this department. Go
As before, enter the first names, surnames and email addresses of the users. Also select whether they have typical manager rights. These typically allow them to obtain spend reports, add other users, authorise jobs, etc. but these rights can be changed once the account has been created. Go
Use the '+' button to add new rows into the grid and use the '-' button to remove a row. Once you're happy with what you're setting up, click 'Save'. Go
The department is not quite ready to go. You will recall setting up task codes - now you need to relate these to prices for the department: Go
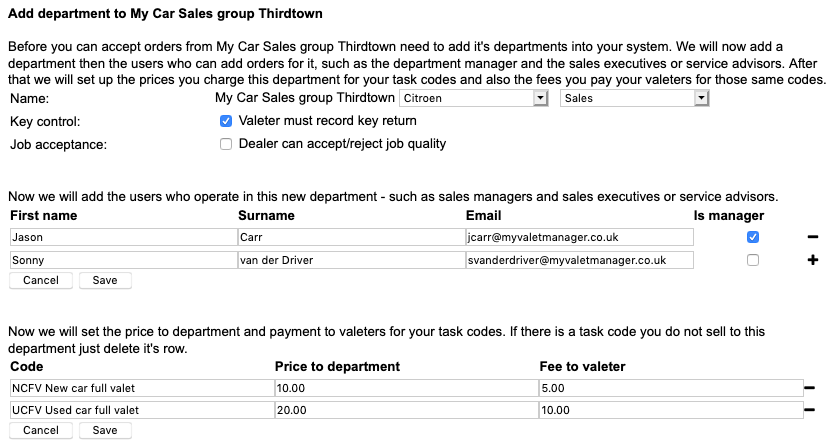
You will see that there is a grid of your standard task codes with zero prices. You can now set the prices you will charge to the department and the fees you will pay to the valeter. If there is a task code that doesn't apply to this department, you can click the '-' button at the end of its row. Don't worry if you delete the wrong one - you can add it later using 'Valeting | Task prices' or 'Valeting | Departments' from the left-hand menu later on. Go
4.5. Testing what you've just done Go
Before you start introducing the system to users at your first dealership and its departments, you would be wise to test the accounts and the settings you've made so far. One approach is to use the 'Log on as' feature described later on (See Log on as). But to also make sure the user log-on accounts behave as you expect, it's wise to test as some of those users first. Go
Remind youself the log-in email address of one sales user and one valeter - you will only need to know their email addresses for now. Go
Then log out from your admin account and log back in as the sales user (remember the initial password is the left-hand part of their email address). From this log-in see if you can create a new job. Go
Their log-in will take you to their dashboard at which you can click their name to see the menu, from which you can click 'Create new valeting order' and then you should see the popup form below. Go
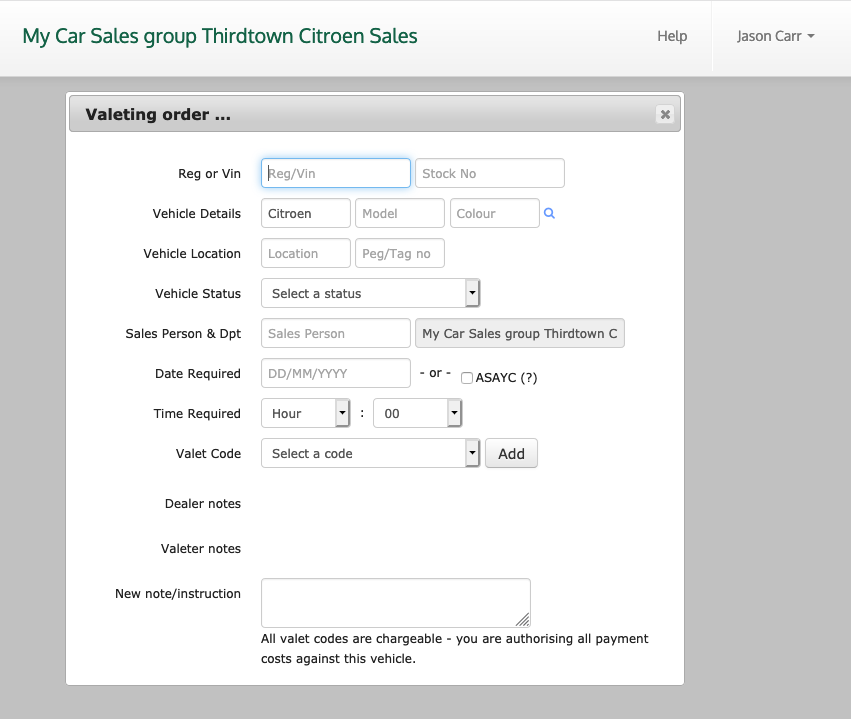
You will see that the drop-down from which you can select a task code for the job contains the items you selected when adding the department. Go

Note that this will have been the first time this user logged-in so the system will by default ask them to change their password. If possible, reset it to the same one you first used so that you still know what to tell them when you start them properly. Go
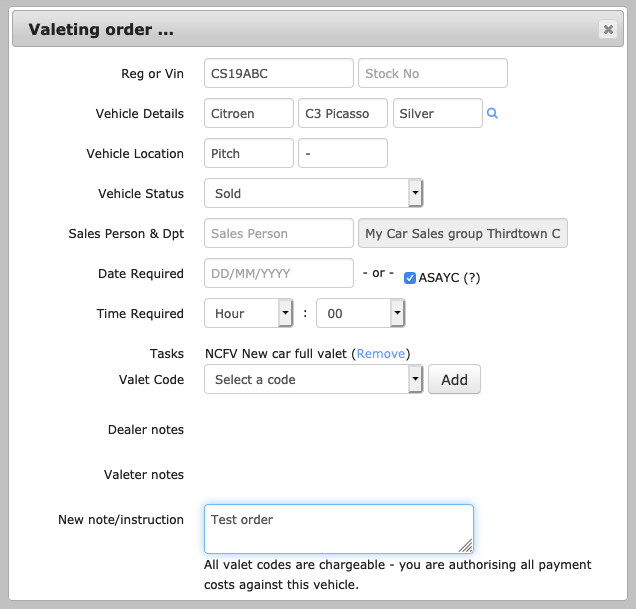
Complete the new dummy order much like the example below and click the 'Save new order' button. Go
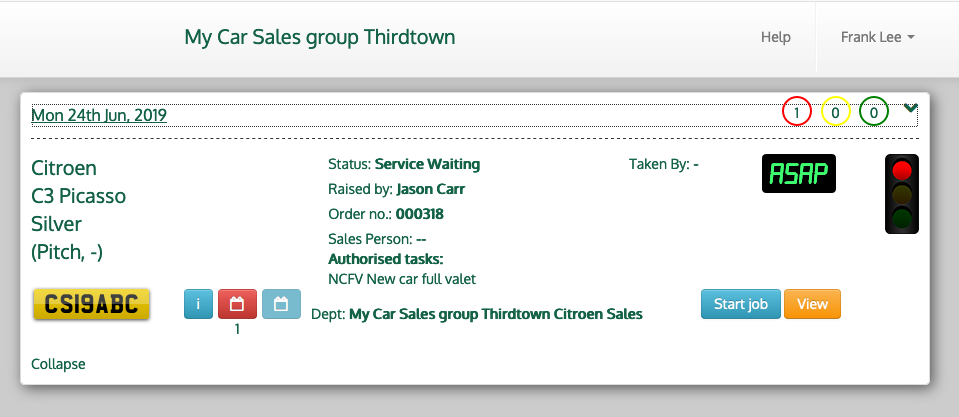
Now log out then log back in as one of your valeters. Note that you will be nagged to change the PIN of the valeter, but ignore that for this test. Go
When you log in you should see something like the dashboard below, but you may need to click on the date area to expand the list of one job! Go
4.6. Next steps Go
You have now added your task codes, your first dealer group with at least one dealership and at least one department with its users and task prices. You have also tested at least a couple of the log-ins you created and should now be ready to move on. Go
The next thing to do is to continue adding departments to your first dealership and then you're ready to introduce the system to your clients and your valeters. Go
There are a few cosmetic things to do before you do - add your own logo and the logo of your dealer group. These are described in Managing my valet company settings and Managing dealer groups Go
5. The dashboard Go
Assuming you've set up your task codes and at least one client dealer group with dealership, department and users, your dashboard will initially show you your live workload and also allow you to carry out many day-to-day activities. Go
Also in this section:
Live workloadAdd QC check
Add user
Create dealership invoices
View department reports
Start event
Security check order
Valeter activity
Add valeter payment
Bulk actions
Log on as
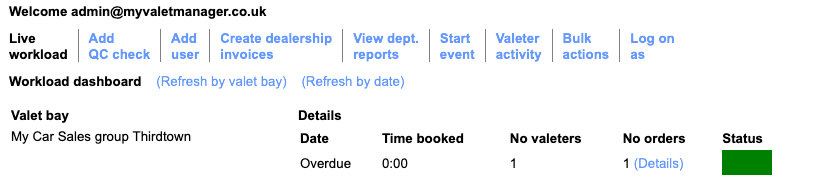
5.1. Live workload Go
The first tab in your dashboard shows the live workload at each of your bays. By default this is a view grouped by valet bay but you can also view it grouped by date. Go
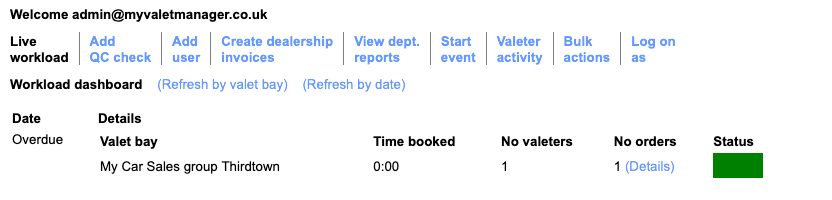
Use one of the '(Refreh by ...)' links to change the view and/or just refresh the view you have. Go
Note that this is based on book-time for each of the tasks on each of the jobs in the system combined with the number of valeters set up for the relevant bay so it is only an estimate of workload. You may need to review the book times you have for your task prices - to do so, see Managing task codes and prices Go
5.2. Add QC check Go
This feature depends on the features included in your subscription but is described here in general. Go
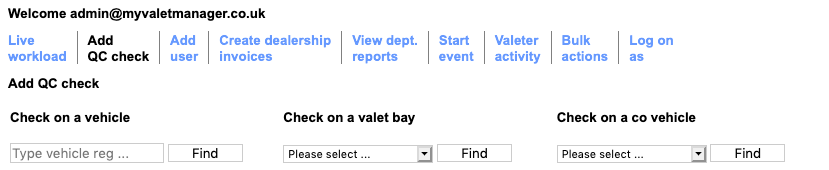
Here you or an area manager can select a vehicle for which a job has been done, or a valet bay or a company vehicle and then see the history of QC forms for it and optionally add/edit one. Go
As part of your subscription set up or later consultancy we may have configured one or more QC form for use by you or your clients. If so, the relevant one is presented allowing the user to answer the questions we've set up for you. The user can save and continue or can save and finish as they go. Once a form is finised, it is sent to the relevant email address as configured in your valet company settings. Go
5.3. Add user Go
This tab of your dashboard allows you to add users into the system. Whereas the wizards for adding dealer groups, dealerships and departments add users in bulk and give them systematic passwords but do not notify the new user, the wizards in this tab of the dashboard create the users with random passwords and email them the new credentials there-and-then. See Adding users for more details on each of the options. Go
5.4. Create dealership invoices Go
This tab of your dashboard allows you to create invoices for work against whole dealergroups or break them down by dealership or department. Go
At first you will see this: Go
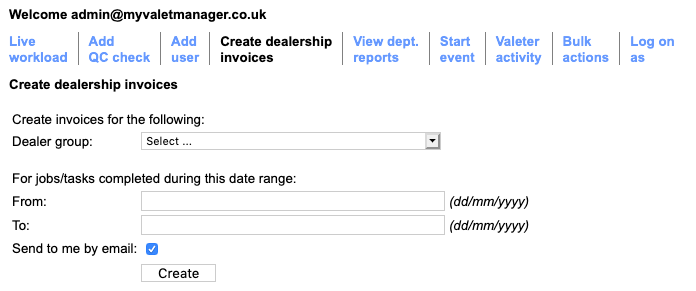
You can now select a whole dealergroup from the 'Dealer group' dropdown and optionally drill-down via a whole dealership right down to just a specific department at a specific dealership as in the example below. Go

You can then specify the date range to invoice. You will also see a checkbox which selects whether you will receive each of the resulting invoices by email one-by-one, or whether you'd prefer to just view or download them within your dashboard. Go
Once you click 'Create' the various invoices will be created and optionally sent to you. Go
Note that although you could simply send each invoice to the relevant client, thay are generally considered as being invoice advices which your accounts team would use as the basis for actual invoicing and to be the detailed backing sheets behind a formal invoice. Go
5.5. View department reports Go
This tab of your dashboard allows you to see the archived spend reports for departments you work with. Go
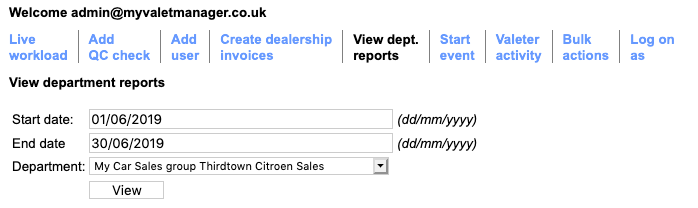
On the first of each month the system automatically creates a report containing all the authorised work for the department during the previous calendar month. To see a filtered list of reports, you can specify a date range and optionally a department and then see a list of the spreadsheets that were created in that period. There is a link you can use to open one in the application most appropriate to the device you are using and the applications it has installed. Go
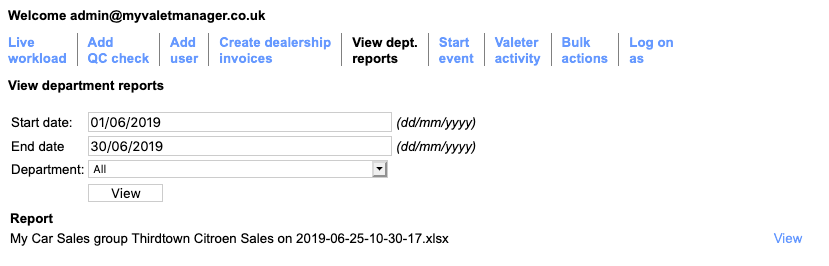
These reports are also available to sales users with relevant permissions within their dashboard under their 'View reports' menu option. Go

5.6. Start event Go
This tab of your dashboard allows you to start a pre-defined set of job templates. See Managing events and event jobs before continuing with this section. Go
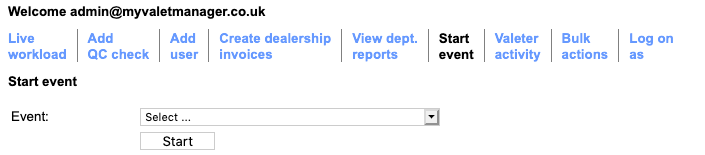
Firstly, select the event you want to start from the drop-down. The list is grouped by 'events I am responsible for' and 'the rest'. Go
Having selected the event to run, click 'Start'. Go
This takes you to a view of the individual templates defined in the event and you can select one or more to start. Go
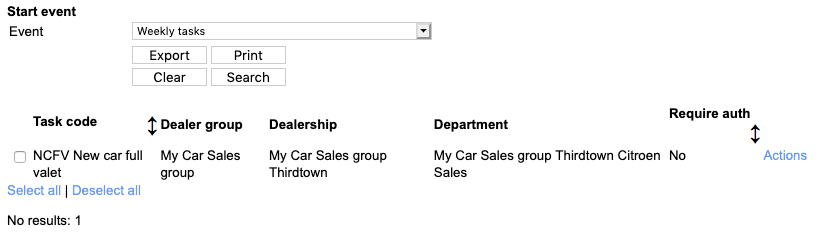
Having selected the ones to kick-off, enter the date and time on which they would be required by and click 'Now'. You will be asked to confirm before the actual jobs are created. Go
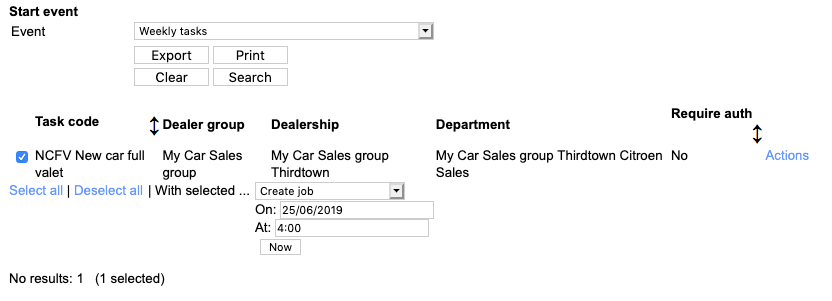
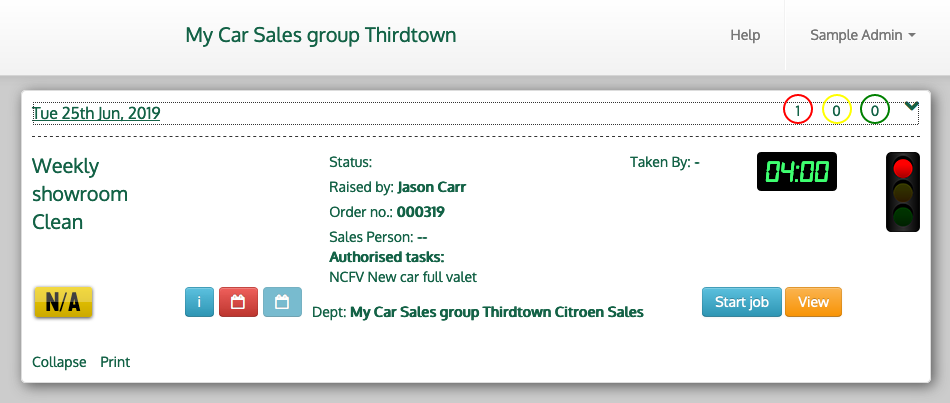
Once the system has created the actual jobs a valeter would see them in their dashboard like this: Go
5.7. Security check order Go
If you have these in your subscription, you can also use the 'Start event' tab of your dashboard to create a security check order. Go
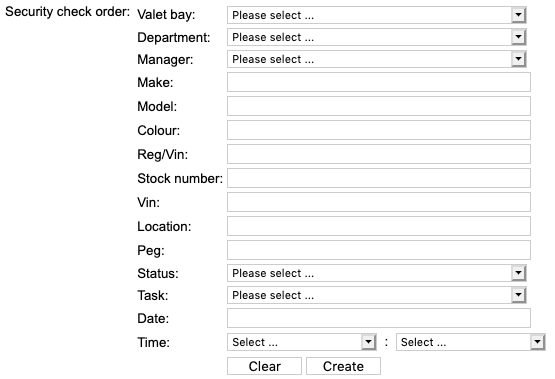
Fill in the job order form to the agreed vehicle details and then click 'Create'. The order will appear as normal in the valeter dashboard but the sales user selected will be notified the job has been created and it's details. Go
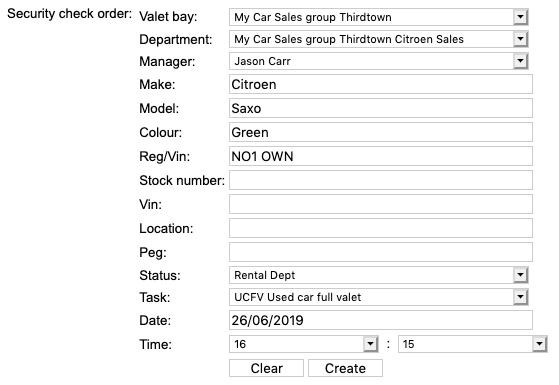
How you use this job is up to you. You can use dummy vehicle details to ensure valeters only claim for real work or you can use it as a planned assessment of work quality. It's also up to you to remove the job from the system before your client gets invoiced unless it's also a real order. Go
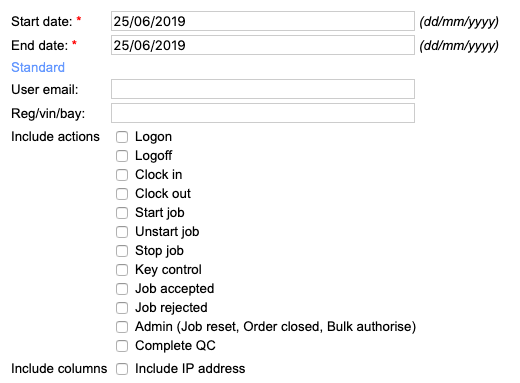
5.8. Valeter activity Go
Using this tab of your dashboard you can audit what your valeters have done. Go
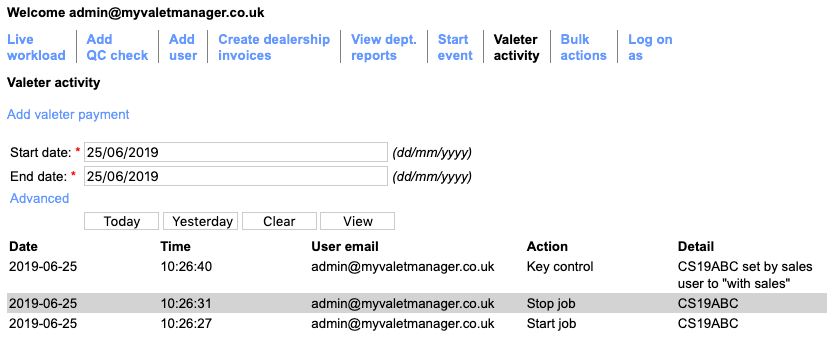
Specify a date range (either by selecting the dates or clicking 'Today' or 'Yesterday'). You can also restrict the view to specific activities or a specific valeter or bay if you click 'Advanced'. Go
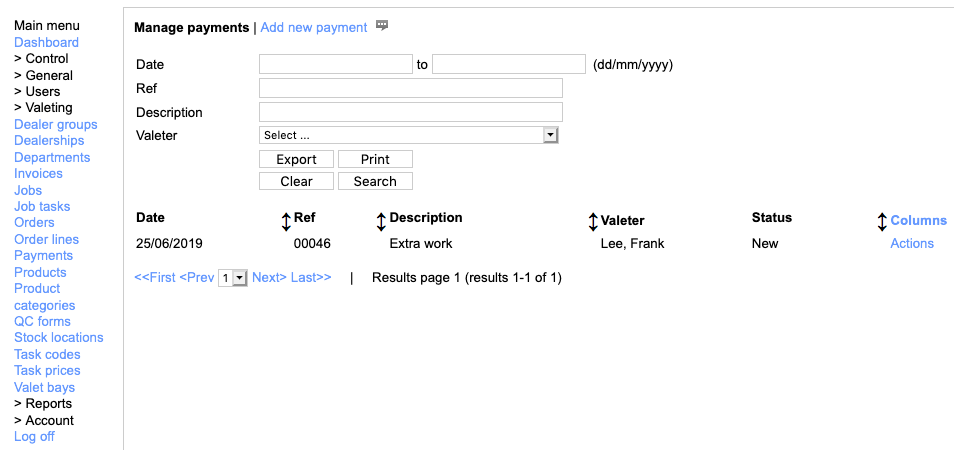
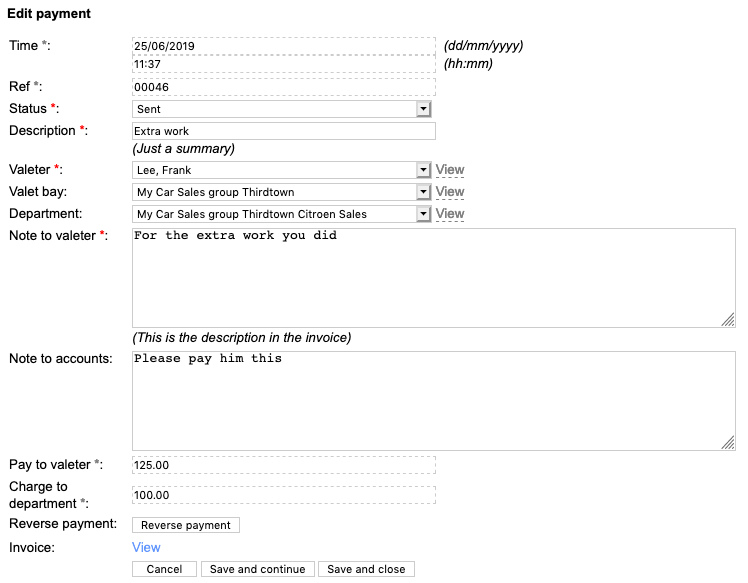
5.9. Add valeter payment Go
In the 'Valeter activity' tab you can also raise a new payment on behalf of a subcontract valeter (or indeed a credit note from that valeter). Go
Click the 'Add valeter payment' link and then fill in the resulting form. Go

The valeter you select is the one the payment invoice would be as sent from and the valet bay and department allow your accounts colleague to know where to re-charge it if appropriate. The 'Note to valeter' will appear in the copy of the invoice which is sent to the valeter but the 'Note to accounts' will not be seen by the valeter. The 'Pay to valeter' and 'Charge to department' fields advise accounts teh amounts to apply. If the payment is actually a credit note, for example for damages or equipment, then also click 'This is a stand-alone credit note'. Go
When you are ready, click 'Save and close'. After a while a PFDF of the invoice will be sent to your accounts email address and the valeter. Go
5.10. Bulk actions Go
This tab allows you to undertake bulk actions on a selected dealer group / dealership / department, specifically to bulk-authorise job tasks which have been added by valeters but can't be invoiced as they have not been authorised by sales users. Go
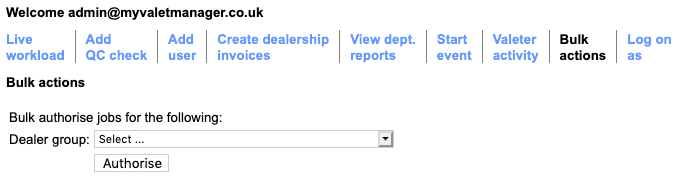
Select the dealer group and optionally drill into the requried dealership and department. Go
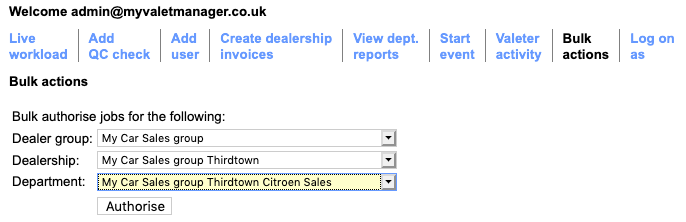
When you click 'Authorise' you will be asked to confirm. Go
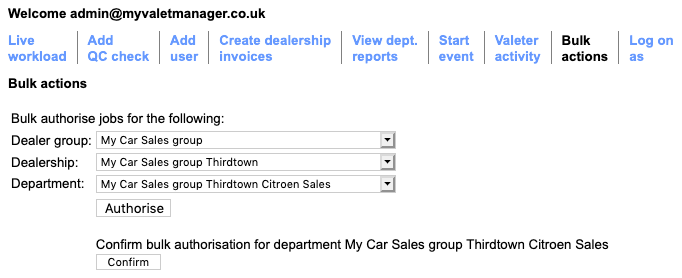
One you've clicked 'Confirm' you will be advised how many jobs were affected by this action. Go
Note that this feature depends on settings in your dealer groups, dealerships and departments. Each has an option such as the one shown below, and this must be enabled all the way down the chain including a department this will apply to. This is a security measure to ensure that area managers or other of your staff can't falsely self authorise jobs unless there is agreement with the client. Go

5.11. Log on as Go
The final tab of your dashboard allows you to see the dashboard view as if you were a sales user or as if you were a valeter. Go
Select either a dealer group from the top option or a valet bay from the bottom option and click 'Log on'. Go
A new tab will open in your browser and in this tab you can see the jobs at the valet bay, or select a department of the dealer group and view the jobs they've added. Go
Your own name is shown in the top of the dashboard menu and anything you do will be audited as you, but it's handy to be able to see this side to perhaps obtain reports or provide support. Go
Be sure to use the 'Close LogOnAs window' menu option when you've finished rather than just closing the browser tab. Go
Note that some browsers on some devices may prevent the new tab opening. If this happens you will probably see some sort of notification that the popup has been blocked. If so, follow browser instructions to allow this in the future then return to the dashboard and try again. Go
6. Adding users Go
In your dashboard are three wizards for adding different kinds of user into the system: Go
These are described in the following subsections. Go
Also in this section:
Add a valeter to an existing valet bayAdd a dealership user to an existing dealership
Add a staff user to this valeting company
6.1. Add a valeter to an existing valet bay Go
Assuming you have already set up a dealership with a valet bay, which typically allows you to add the valeters in bulk, this wizard differs by allowing you to add just one valeter at a time. It does however allow you to set up all their options and deductions in one go. Go
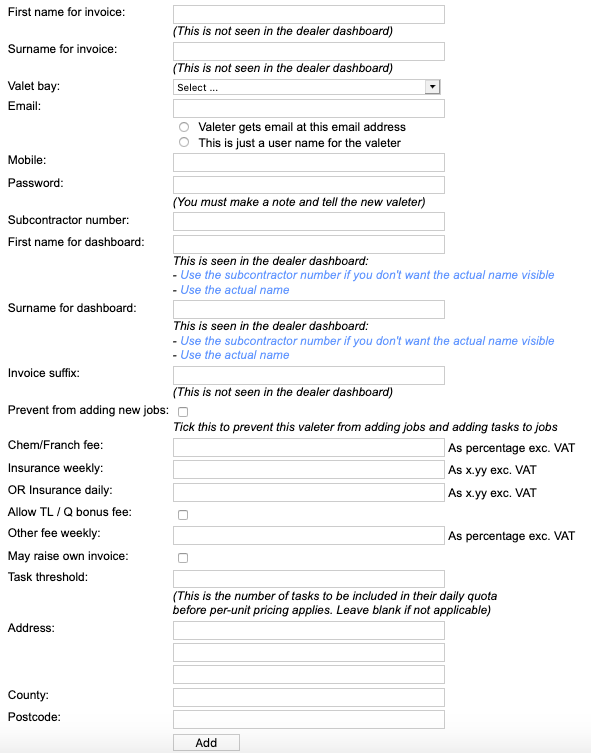
The fields 'First name for invoice' and 'Surname for invoice' are only used in invoices from the valeter to you and should be their formal names. Now select the valet bay this valeter will work at. Go
Note that if you are simply creating a second log-in for them to use at a second valet bay, you should do this from Duplicating a valeter account. Go
Either enter their actual email address and click 'Valeter gets email at this email address' or invent a user name and click 'This is just a user name for the valeter' if the valeter has no email address and therefore will never receive emails from the system. Go
Enter their mobile number and also make up a password for them, which you will have to pass to them outside of the system. Go
If you operate with subcontractor numbers, enter the one you want to use. Go
Note with the above information, the system offers you defaults as you go (assuming you also have the 'Next subno suggestion' setting in your own valet company setup). Go
These defaults can be overridden as you go, but they just reflect good practice for subcontract valeting. Go
The 'First name for dashboard' and 'Surname for dashboard' fields are visible on the sales user dashboard so you are free to keep the anonymous subcontractor number suggested by the system or to use actual names or even nicknames. Go
The 'Invoice suffix' is used as part of the PDF file name for invoices sent to you by email or downloaded from the system and can help you locate the right file as you collect many over time. Go
The 'Prevent from adding new jobs' option would be set if this valeter is not allowed to add jobs into the system or to add tasks into existing jobs. The default if you do not tick this is that the valeter will be able to add jobs and will be able to add tasks to existing jobs. Go
If you operate with deductions from your valeters, this is where you define the amounts for this new valeter. Go
Assuming weekly invoicing from valeters to you, the 'Chem/Franch fee' is a percentage and is deducted from the total of jobs or timesheets. You can also set up 'Insurance weekly' and/or 'Insurance daily'. Typically these figures are an amount in pounds and you would use one or the other. However, if you operate to a daily amount capped weekly, you can use both such that you might set daily as 2.00 then to cap at five days, you also set weekly to 10.00. Therefore valeters would never get charged 12.00 or 14.00 for a 6/7 day week. Go
The checkbox 'Allow TL / Q bonus fee' allows you to enter a bonus fee that can be collected by teh valeter as a team leader of for conducting QC checks for you. The field 'TL / Q bonus fee' becomes available for you to enter a fee in pounds.pence . Go
The value in 'Other fee weekly' is the percentage that will be deducted from 'Other' fees added into their self invoice by the valeter. The actual amount can be for whatever reason you allow but this percentage will be deducted from it. Go
If you tick 'May raise own invoice' this valeter is allowed to raise their own self invoice from within the system. Note that if they do so, your accounts team and area managers may need to verify amounts claimed in the invoice. If you don't tick this, you will need to ensure you do bulk invoices once a week on behalf of your valeters. Go
The 'Task threshold' value defines the number of tasks the valeter is expected to do in a day within their contract for e.g. a minimum rate of pay such that any additional tasks give them the relevant per-unit fee for the task. Go
The address, county and postcode fields are then used for inclusion in the invoices from the valeter and to carry into HR records if you have these enabled in your subscription. Go
When you are ready click 'Add' to create the account. Note that this does not automatically send them an email with their log-in details - you will need to do this yourself. Go
6.2. Add a dealership user to an existing dealership Go
This wizard in your dashboard allows you to add a single user to an existing dealer group, dealership or department. Go
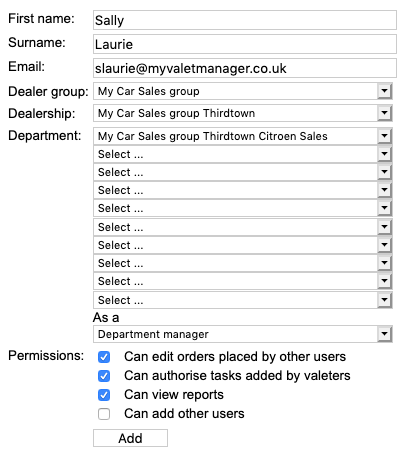
Enter their first name, surname and email address then drill into their dealer group to the required level - as a dealer group manager, dealership manager or a manager or otherwise in a specific department. Go
Note that you can select one or more departments for which they can use the system - useful if you are creating a user who does not need access to quite all the departments in their dealership where otherwise they would be set up as a dealership manager. See User roles for more information. Go
Also select the role they have and optionally tick one or more of the specific permissions you might want thenm to have. Go
When you are ready, click 'Add' to create the new account and send an email to them with their user name and password. Go
6.3. Add a staff user to this valeting company Go
Use this wizard to add a new user such as an area manager or admin user. Go
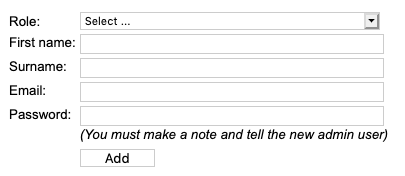
Select the role they are to have then enter their name and email address. You must also create them a password. Go
When you are ready, click 'Add' to create the account and then advise the new user of their user name and password. Go
7. Managing users Go
This section describes general ways to add, edit or delete users. For details on adding specific kinds of user, see Adding users. Go
Also in this section:
The user listUser roles
Editing a user
Duplicating a valeter account
Disabling a user account
7.1. The user list Go
Your list of users is available from 'Users | Users' in the left-hand menu and shows the first page of your users. Go

To edit one, click in its row then click 'Edit' from the popup quick view, or select 'Edit' from the 'Actions' menu at the right-hand end of its row. Go
7.2. User roles Go
All of your valeters will be of user type 'Valeter'. Sales users can be split into the following roles which broadly reflect typical users in larger dealerships: Go
- Go
- DealerGroupManager
- DealershipManager
- DepartmentManager
- SalesExec
- ServiceAdvisor
- Observer
- ProgressChaser
The staff in your valeting company can have one of the following roles Go
- Go
- ValetCoDirector
- ValetCoAdmin
- ValetCoAccounts
- ValetCoSupervisor
- StockManager
7.3. Editing a user Go
To edit a user click 'Edit' in their 'Actions' menu in the grid or click the row and click 'Edit' in the quickview popup. Go
The field and tabs that you see will depend on the kind of user this is, but the fields you have access to include the ones you would have set up when you added the account. Go
Of note are: Go
PIN - this is a four digit PIN used by a valeter from within their logged-in dashboard which allows them access to their invoices or orders. Go
Logout - this is the time in minutes after which they are logged-out from the dashboard if they don't interact with the web browser. Go
External links - these settings define whether or not the user can see selected custom links in their dasboard menu, typically used to link to other web sites or systems used by your valeting company. Go
Enabled - this allows them or prevents them from logging-in - useful to restrict access once a user leaves. Go
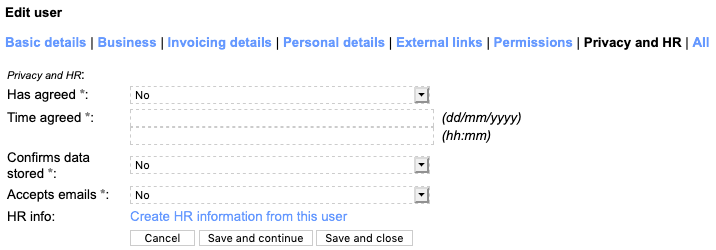
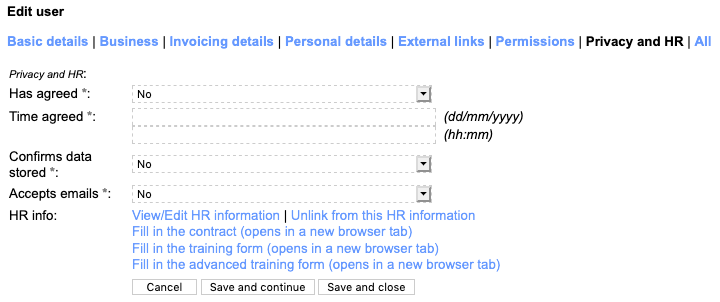
Privacy tab - these show you whether a user agreed the privacy policy and has agreed they may be sent emails via the system. Go
Sales - Department(s), Dealership, Dealergroup - don't select at more than one level as this defines what access they have. A user either has one (or more) departments, or a dealership or a dealer group, not a mixture. Go
Sales - Only use / report on and Other dealer groups - these allow a user access across dealer groups or restrict reporting. Setting these is best done after discussion with the ValetManager support team as misuse can break your privacy terms between your clients. Go
Sales - Can report - this allows a sales user access to the built-in spend reports in their dashboard, typically prevented for a junior. Go
Sales - Feedback and Survey settings - these should only be used if you have such forms set up in your subscription. Go
Sales - Prevent ... fields - these allow or prevent a sales user to create jobs which are required within the stated periods. Go
Valeter - General logon - this configures the account to be a general one that all valeters at a bay can know but it can't raise invoices as it's not a specific person. Go
Valeter - Valeting team leader - this allows the valeter access to certain QC forms if configured in your subacription. Go
Valeter - Valeting area supervisor - this allows access to certain QC forms if configured in your subscription. Go
Valeter - Restricted cats - this defines whether a valeter is allowed to order products from selected categories which are considered dangerous to non-trained users. Go
7.4. Duplicating a valeter account Go
If you have a valeter who works at more than one valet bay they will need an account at each bay. This is to make sure their name appears in the list when starting a job and to ensure they have settings appropriate to the bay and the dealership it's for. Go
Above you will see the name of the valet bay for this account and underneath that, a drop down you can use to select which bay to duplicate their account to. Go
Before you use this, make sure they have a subcontractor number set in the 'Invocing details' tabe as this is used to link the two accounts. Go
Select the valet bay and then click the 'Duplicate' button that appears when you make a selection. Go
This will duplicate the account copying with it the deduction figures and other settings, which you can modify later on. Go
Back in the users grid you can see the two accounts and if you show the hidden 'Valet bay' column you can tell which account is which. You may like to rename one of them for convenience. Go

7.5. Disabling a user account Go
It is not encouraged to delete a user account, but rather use the 'Enabled' field when editing their user account: Go
8. Managing my valet company settings Go
As an admin user there are certain settings you can make by yourself about your account. These are available to you from "Users | Valet co's" in the left-hand menu: Go
From here you can click 'Actions' and then click 'Edit': Go
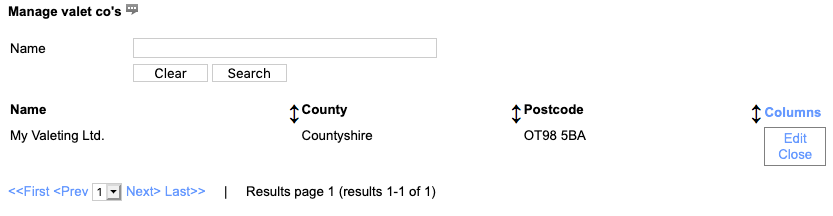
or you can click in the row of details and then click 'Edit' in the QuickView popup. Go

Either way, the editor opens up allowing you to edit the details of your valeting company. Go
Also in this section:
Key details tabEmails tab
Logo tab
Logo/Docs tab
Dealer groups tab
Task codes tab
Customisation tab
Payments tab
External links tab
8.1. Key details tab Go
The first tab is simple things such as contact details but also includes fields that control financials and HR (if supported in your subscription): Go
Deductions ex-VAT Go
If you use deductions in your valeter self-invoicing, this setting decides whether they have also have VAT deducted. Go
Dashboard notifications Go
This setting along with the next two control HR record management if you have this in your subscription. This setting determines whether you and area managers see notifications about HR deadlines in your dashboard. Go
Next subno suggestion Go
This setting determines, initially, the next subcontractor number to issue to a new valeter if you use this facility. It prevents your area managers from accidentally using the same number for two new starters. Go
New HR grace period Go
This setting is the number of days that area managers don't get nagged for updates to new HR recods. Go
HR issues block dashboard Go
In combination with 'Dashboard notifications' this setting ensures that area managers can't ignore an HR deadline. Go
Clock in/out rounding Go
If you have valeters who clock in/out using ValetManager this setting (set as either 0 or 30) determines whether their clock-in and clock-out times are recorded to the minute or rounded to the nearest xx:00 or xx:30 time. Go
Autoapprove timesheets Go
As above, if you have valeters who clock in/out with ValetManager, this setting determines whether timesheet entries to be invoiced automatically on a Tuesday require approval by a sales user or whether the system will approve them by itself. Go
8.2. Emails tab Go
The second tab is the email addresses that various types of email get sent to. For each one, you can specify multiple addresses and they should be separated by a semicolon: Go
e.g. admin@myvaletmanager.co.uk;sales@myvaletmanager.co.uk Go
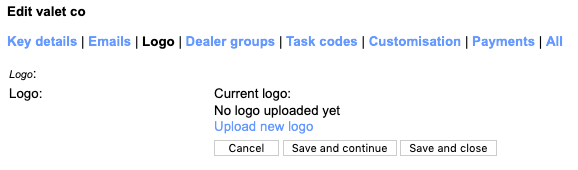
8.3. Logo tab Go
On this tab you can upload your own company logo for use in the dashboard seen by your clients and valeters. This appears at the left-hand end of the top area of the screen. Go
To upload your logo, click 'Upload logo' in the Logo tab. Go
You will now see an area into which you can either click to select an image file, or drag an image file into it. Go
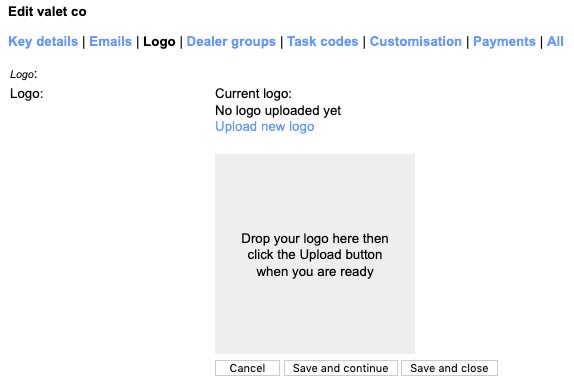
Once you have dragged or selected a file you can see a preview of it along with some buttons. Note that the image needs to be square to fit the layout of our header area. Go

Once you are happy that you have the right logo in the right shape, click the 'Upload' button which is the right-hand one of the three inside the logo preview. Once you have uploaded this image you can see a thumbnail of it in the editor and you can deletee it to use a different one if you need to. Go
8.4. Logo/Docs tab Go
If you have permission to manage your document repository, instead of the Logo tab, you will see a Logo/docs tab Go
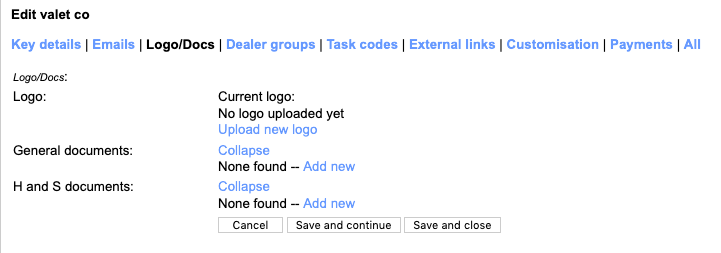
Here you will see a list of documents related to Health and safety, and a list of documents classified as General. Go
To add a new document, click on the 'Add new' link within the group of choice. You will see a popup as shown below. Go
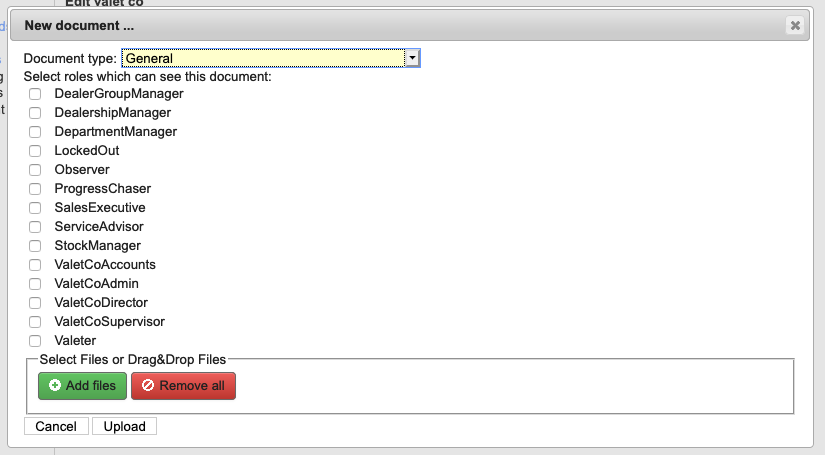
Tick each of the user roles that is allowed to see this document in the repository and then select the file using the green 'Add files' button. Once you have located the right one, click 'Upload'. The screen will refresh to show the updated list. Go
By each document there is a View link and Delete link. Go
This is also true for dealergroups, dealerships and departments, so you can make available the same document to all users by uploading it to your valet company, or you can restrict it to all users in one dealer group by uploading it to that one dealer group instead. At the department level there is also a price list which sales users can open in a separate tab, and of course you can upload documents at the department level to make them avaialble to just those sales users. Go
8.5. Dealer groups tab Go
This is a list of the dealer groups in your system. See Managing dealer groups for more information. Go
8.6. Task codes tab Go
This is a list of the taskcodes in your system. See Managing task codes and prices for more information. Go
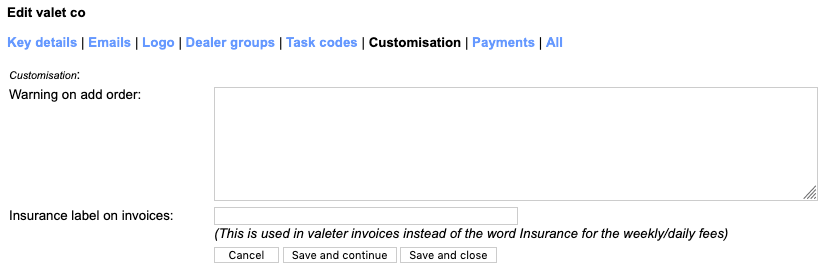
8.7. Customisation tab Go
The customisation tab allows you to modify the warning seen by clients when they add an order. Essentially this tells them that they are liable for orders they place, but if our default wording needs tuning, you can enter the whole thing here. Go
You can also define words that accompany a specific deductions entry in a valeter self invoice with deductions. Go
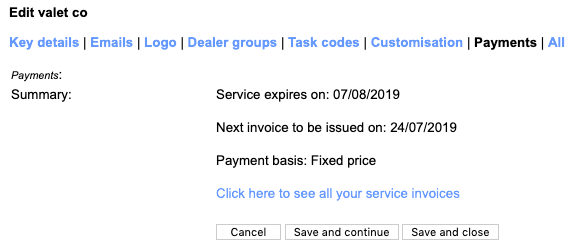
8.8. Payments tab Go
If your subscription is on credit card payments you can see here the expiry date of your subscription, the basis for your subscription and when your next invoice will automatically be issued for payment. Go
8.9. External links tab Go
This tab allows you to manage the text and links available in the menu of the sales dashboard Go

9. Managing dealer groups Go
This section describes featues for managing the dealer groups in your account. Go
You manage dealer groups from the 'Valeting | Dealer groups' option in the left-hand menu. Go

Also in this section:
Adding a new dealer groupEditing a dealer group
Deleting a dealer group
9.1. Adding a new dealer group Go
We always recommend to add a new dealer group using the wizard described in Adding your first dealer group. Please refer to that for more information. This is our preferred approach as it ensures you have consistent names for things in your system and you will find this helps you use the system. Go
The wizard can be used from the Manage dealer groups screen. Go
9.2. Editing a dealer group Go
Select a dealer group from the grid in 'Manage dealer groups' and edit it from the 'Actions' menu or the 'Edit' button in the quickview popup. Go
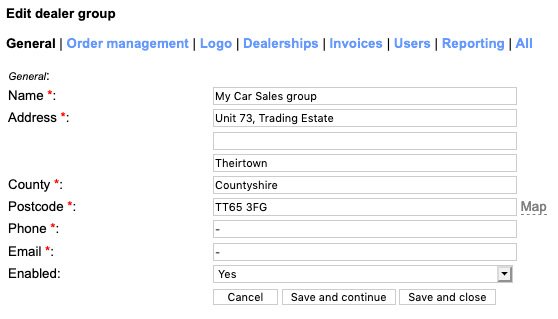
In the first tab you have all the main settings, such as were set up in the wizard when you added the dealer group. Go
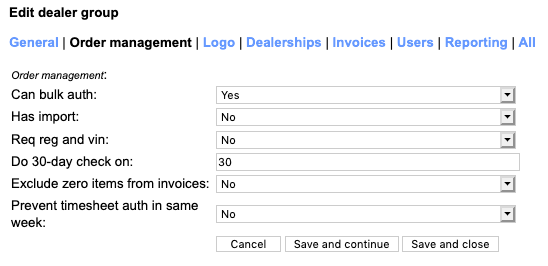
The second tab has order management controls which can be used to fine-tine how this dealer group works. Go
Can bulk auth - setting this allows you as valeting company to authorise multiple jobs at a time from your dashboard to work around sales users who won't for whatever reason. Go
Has import - this option requires consultancy from the Valet Manager support team but can be used to import stock files from the dealer group for use when adding jobs into the system. The user must select a stock number based on vehicle registration and cannot easily add jobs for arbitrary vehicles. Go
Req reg and vin - this controls whether a job must have reg and vin or just one or the other. Go
Do 30-day check on - The system has a 30-day check which can prevent duplicate or unwanted orders and althought this check defaults to jobs in the last 30 days, you can tune it per dealer group. Go
Exclude zero items from invoices - Invoices sent to clients by default include all jobs whether actual vehicles or timesheet entries. In some cases the client does not need details such as the vehicle reg for all jobs, and so in some situations this option can reduce the undue detail in the invoice so they just see timesheet sessions, for example. Go
Prevent timesheet auth in same week - where the client authorises timesheets of valeters who clock in and out, this setting allows or prevents sales from authorising timesheet entries in the same week which in turn can prevent a valeter invoicing for sessions before they are allowed to. Go
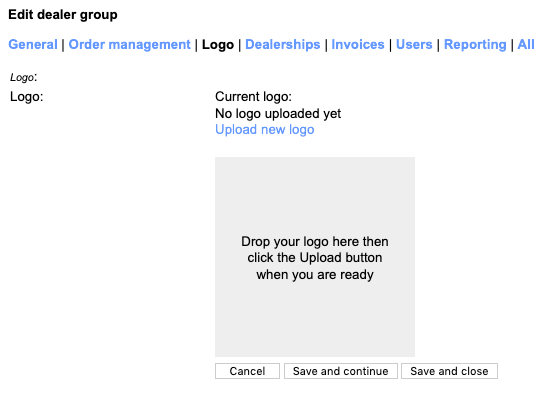
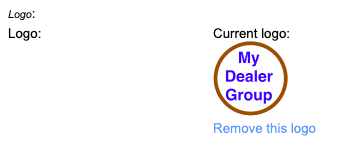
In the 'Logo' tab you can upload a square version of the logo of the dealer group. This is seen in the dashboard after a sales user has logged-in and reassures them this system is for them to use. Go
First click the 'Upload new logo' link and then drag a square image into the grey area or click in it to select a file from your desktop computer. You will then see an 'upload' button to the right-hand side of the logo preview. Click this to upload the image. Go
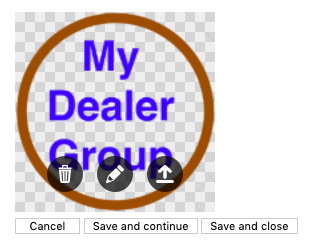
To replace the logo click 'Remove this logo' then repeat the process. Go
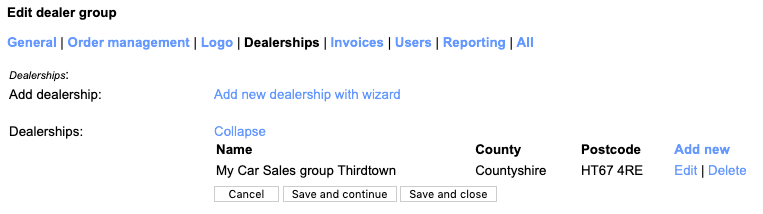
The 'Dealerships' tab allows you to drill into the dealerships already in this dealer group or to add a new one using the 'Add new dealership with wizard'. This uses the wizard as described in Adding your first dealership Go
9.3. Deleting a dealer group Go
We do not recommend ever deleting a dealer group, simply to ensure reliability of your data. If you do accidentally delete one, contact our support team. Go
10. Managing dealerships Go
This section describes featues for managing the dealerships in your account. Go
You manage dealerships from the 'Valeting | Dealerships' option in the left-hand menu. Go

Also in this section:
Adding a new dealershipEditing a dealership
Deleting a dealership
10.1. Adding a new dealership Go
We always recommend to add a new dealership using the wizard described in Adding your first dealership. Please refer to that for more information. This is our preferred approach as it ensures you have consistent names for things in your system and you will find this helps you use the system. Go
The wizard can be used when editing a dealer group. Go
10.2. Editing a dealership Go
Edit a dealership by clicking 'Edit' in the 'Actions' menu for its row or clicking into the row and clicking 'Edit' in the quickview popup. Go

The first tab contains the settings you entered when you added the dealership with the wizard Go
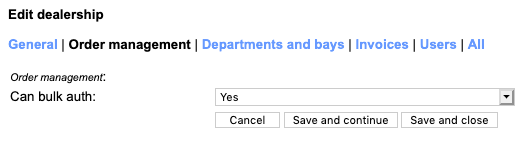
The second tab controls whether departments in this dealership can have bulk authorise turned on for your area managers to use. Go
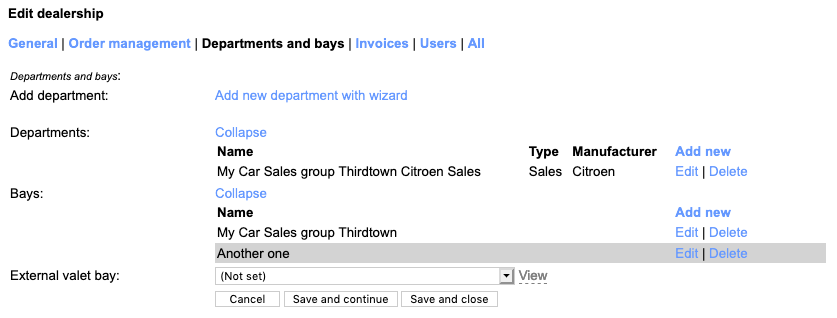
The 'Departments and bays' tab allows you to add or edit departments and valet bays in this dealership. Go
Click 'Add new department with wizard' to add a new department with its users and task prices. Go
You can drill into existig entities or add a new valet bay to the dealership. Go
You can also specify that jobs for this dealership all go to a specific valet bay. This is typically where two dealerships are next door to each other and they share a valet bay, or all work is done off-site at a specific location you operate. Go
10.3. Deleting a dealership Go
We do not recommend ever deleting a dealership, simply to ensure reliability of your data. If you do accidentally delete one, contact our support team. Go
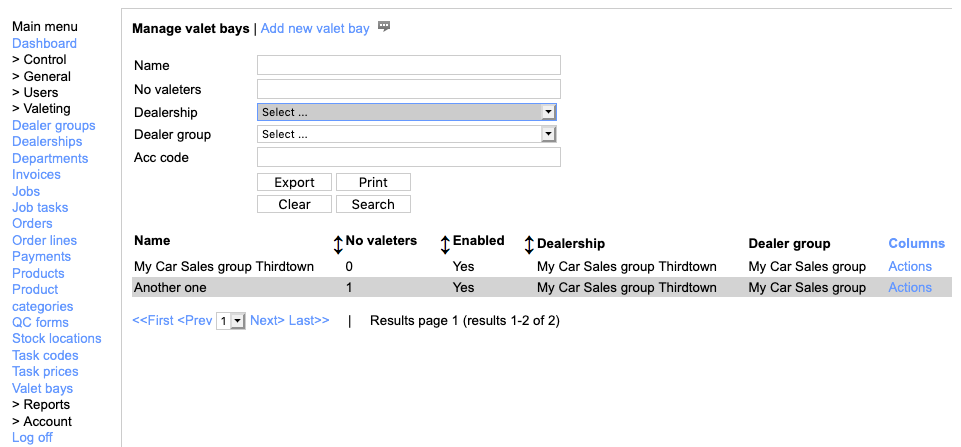
11. Managing valet bays Go
This section describes featues for managing the valet bays in your account. Go
Also in this section:
Adding a new valet bayEditing a valet bay
Deleting a valet bay
11.1. Adding a new valet bay Go
Although the wizard to add a dealership also creates a valet bay and valeters for the dealership, you sometimes need to create an additional bay. For example if the dealership requires one bay for one franchise and another for another, or one for service washes and another for sales. Go
To add a bay, click 'Add new valet bay' above the grid of valet bays. Go
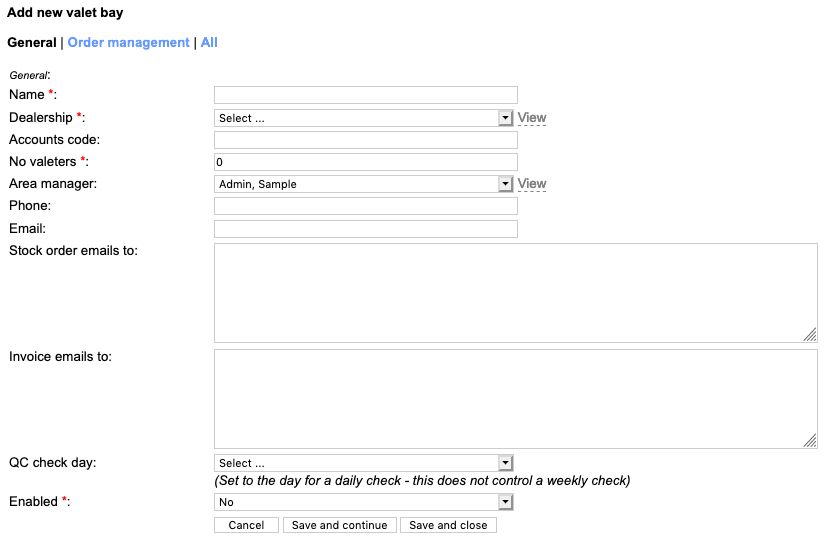
In the first tab, enter a name, and select the dealership where the bay is located. You must specify at least one valeter to allow workload estimations to work, but you don't need to enter an accounts code unless you or the client need it to be shown in invoices. Go
You can also specify where product order emails and valeter self invoices are sent in case a specific staff user (such as an area manager) needs them as well as the general accounts email address or orders email address. Go
If you have QC checks in your subscription you can also select which day a valeter will be asked to complete a QC / H&S form before they can start the first job of the day. Go

The order management tab allows you to specify the following: Go
Alpha sort - By default all jobs in the day are sorted by their required by time. If the bay or department works in such a way that all jobs are set for due at the same end-of-the-day time, use this setting to help valeters locate the right order, sorted by vehicle reg/vin. Go
Diary test on save - this setting forces all new jobs to be tested for availability of time before the 'required by' time to ensure your valeters have a chance. This requires reasonable book times for the job tasks and also a suitable number of valeters stated as working at the bay. Go
Can unstart - this setting allows a valeter to 'unstart' a job he has started in error. Go
Confirm on start - this setting requires a valeter to enter their password when starting a job to ensure the right valeter can invoice for the job. Go
Closed on ... - these settings allow you to prevent jobs being raised for days the bay is unstaffed. Go
The 'Orders' tab allows you to define which days of the week valeters at the bay may place stock order. Go
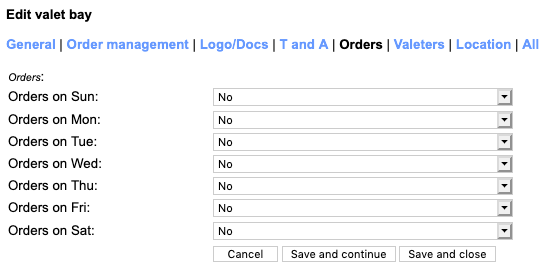
When you are ready click 'Save and close' to save the new valet bay. Go
11.2. Editing a valet bay Go
You can edit a valet bay from the grid of bays and edit any of the fields you set up when adding it. Go
11.3. Deleting a valet bay Go
We do not recommend ever deleting a valet bay, simply to ensure reliability of your data. If you do accidentally delete one, contact our support team. Go
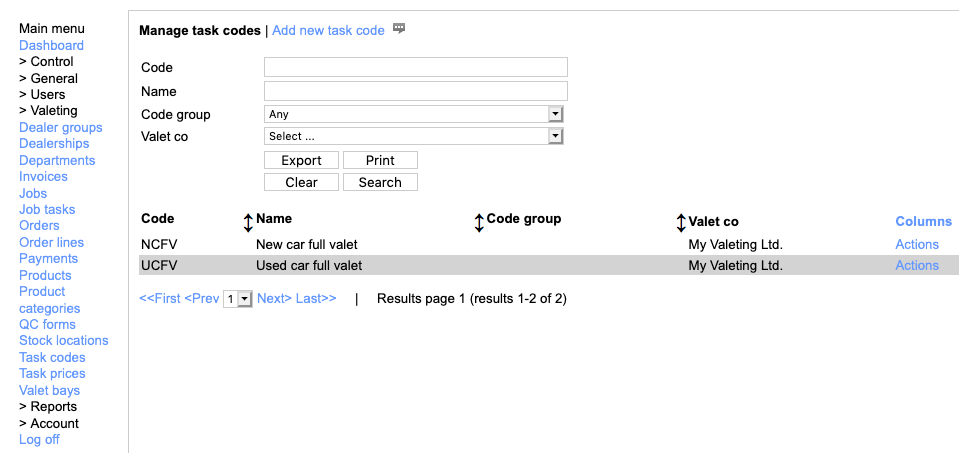
12. Managing task codes and prices Go
This section describes featues for managing the task codes and prices in your account. Note that you should also refer to the section on setting up your codes for the first time, as we recommend you do that first. Go
Also in this section:
Adding or editing a task code or task priceManaging prices for a task code
Deleting a task code or task price
12.1. Adding or editing a task code or task price Go
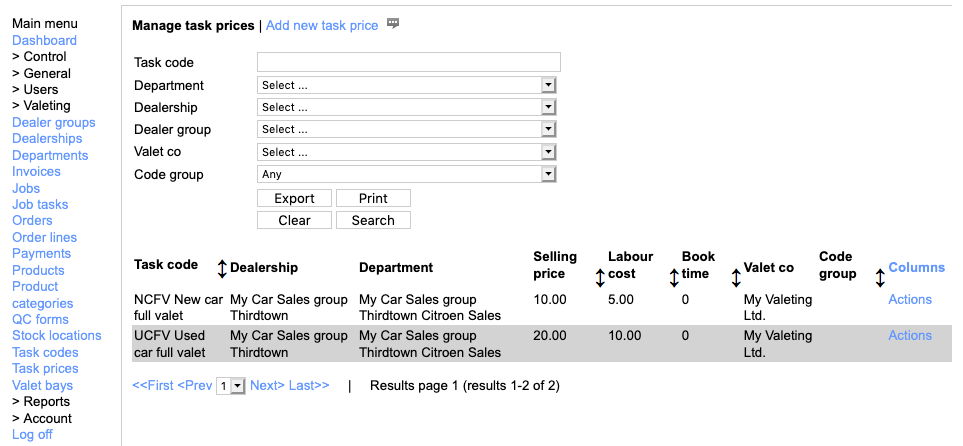
To work with your task codes and prices, use 'Valeting | Task codes' or 'Valeting | Task prices'. Go
A task code defines what codes you offer overall for valeting services, such as NCFV New car full valet, and a task price relates this to a specific department giving it a price and book time plus other settings. Go
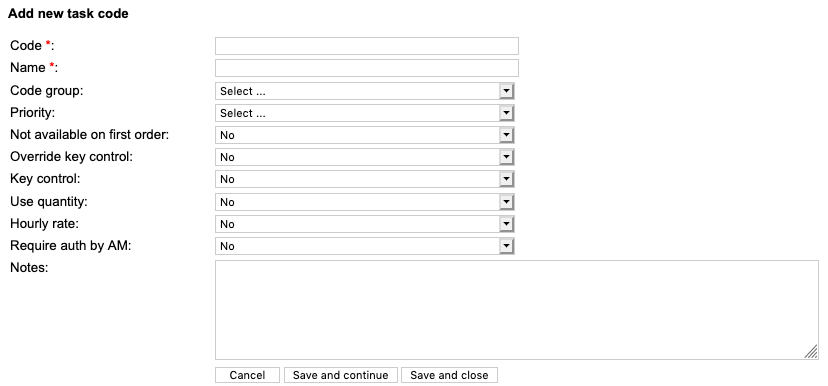
To add a task code, click 'Add new task code' above the grid of task codes and enter the relevant information. Go
The code and the name are mandatory and offer space for an abbreviated code and a full name. Go
The other fields allow it to relate to specific classes of vehicle or to a specific priority level. You can also prevent a code such as 'reclean' being used on the first job you ever see for a specific vehicle. Go
You can set whether this code requires or removes key control from the job. Go
You can set whether this code allows the sales user or valeter to specify the quantity of items in the job (for example the number of vehicles cleaned in site maintenance). Go
You can specify whether this code is the one to apply for hourly rate timesheet sessions based on the valeter clocking in or out. Go
You can specify whether jobs using this code require approval by your area manager before they can be included in invoices to the client (for example to agree the number of vehicles cleaned in a showroom wash). Go
Once you have set what you need, you can click 'Save and close' to move on. Go
12.2. Managing prices for a task code Go
Once you have a code defined, you need to add task prices for it, which relate a code to a department. Go
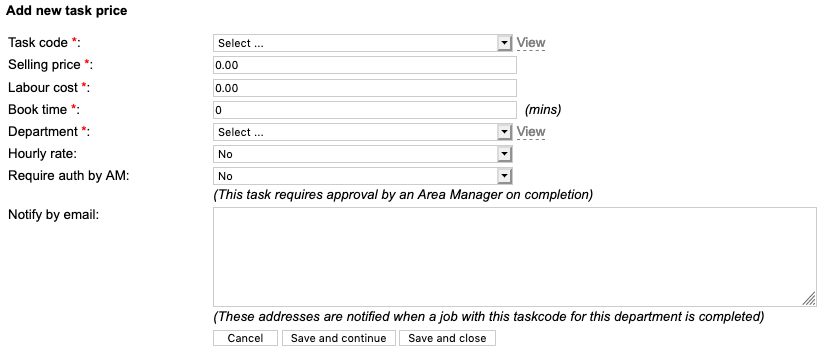
Here you can specify the price to the dealership and the fee to the valeter as well as relate the code to the department. A sales user in a given department can only select from codes you've set prics for. Go
Set the book time if you want decent workload reports or diary checks when sales add jobs. Go
The fiels for 'Hourly rate' and 'Require auth by AM' are inherited from the task code and are shown here for reference. Go
You can also set up email addresses to notify wnen a job with this code is completed. For example, the service advisor might be notified automatically whenever a service wash is completed. Go
When you have set all you need for a task price, click 'Save and close'. Go
12.3. Deleting a task code or task price Go
We do not recommend ever deleting a task code or price. However, if you need to you can, but delete the task prices before you delete the related task code. Be aware that any jobs with these deleted task codes may not invoice properly to your clients. Go
13. Managing departments Go
This section describes featues for managing the departments in your account. Go
Also in this section:
Adding a new departmentEditing a department
Department order management options
Deleting a department
13.1. Adding a new department Go
We always recommend to add a new department using the wizard described in Adding your first department because it allows you to quickly set up the task codes and users in the new department. Please refer to that for more information. This is our preferred approach as it ensures you have consistent names for things in your system and you will find this helps you use the system. Go
The wizard can be used when editing a dealership. Go
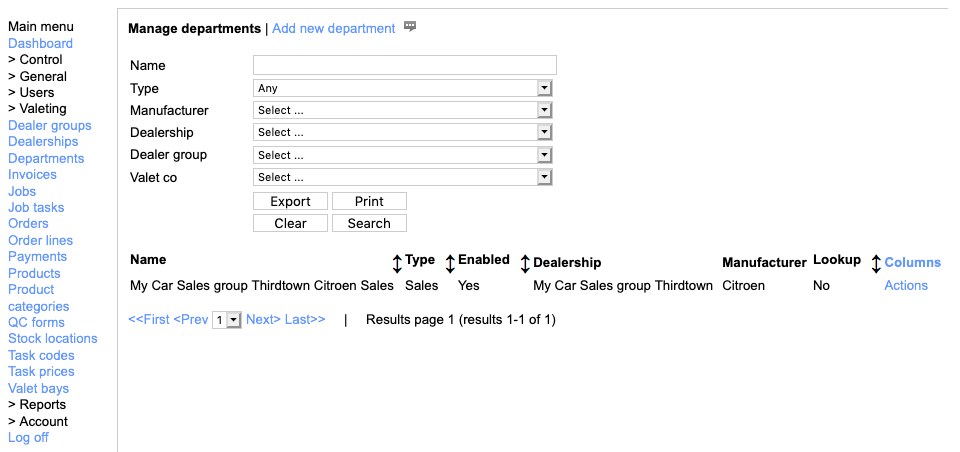
13.2. Editing a department Go
The first tab for editing a department is the typical things you entered when creating it with the wizard. Go
Sometimes a department needs to be able to send jobs to a range of valet bays including ones you operate at a different dealer group. You can make that setting here and name the dealer groups from which they can select a bay. Tyoically this might be where a dealer group trades under two or more names but works closely across their names. Go
If this department needs to feed jobs to a specific valet bay (if the dealership has two or more set up, or if it uses one off-site), you can select that here. Go
The fields 'Our ref' and 'Your ref' are used on invoices to help the client relate the charges to the correct accounts code. Go
On the 'Task prices' tab of the department you can see the codes with prices this department has access to. If it's not yet set up (perhaps because you have manually created the department) you can also select a department to use as a template to copy from ready for use in this department. This is the 'Copy prices from' dropdown and the 'Copy' button you can see below. Go
13.3. Department order management options Go
Order management for a department is quite rich. Go
There are options to control how soon a department can raise an order - for example to stop it asking for an order within 24 hours, or the same day. Go
The setting for 'Can bulk authorise' allows your area managers to authorise jobs and tasks the sales users don't have time to. Go
The settings for 'Only place short orders' and 'Can place short and long orders' govern what sorts of jobs can be ordered. A long order is a normal valeting job whereas a short order is for example 'Site maintenance' or 'Commercial cleaning' for which make/model/colour is not relevant. These are task codes for which 'Use quantity' is set to Yes. Go
The settings of '... is optional' allow you to need or not need certain fields when adding a job. For example, if the dealership only ever deals with Ford, you may never bother to ask for Make when taking a new job. Go
If every job is always e.g. a "Service wash 1", then this can also be set as the default task code, and if every new job is always 'Service' you can set that as the default status. You can also set which status options you want to offer to users in this department. For example, you might never let service advisors raise a job of type Sold. Go
The 'Lookup' setting works in conjunction with the equivalent for a dealer group to require users to raise jobs from a pick list of stock numnbers rather than freehand reg/vin. This setting requires consultation with the ValetManager support team. Go
If your contract with the deparment includes a minimum daily number of jobs, this number can be set with 'Task for allocated threshold' alongside the actual quantity in 'Threshold for allocated tasks'. Go
Key control and job acceptance can be enabled for this department here as well. Go
The standard 30-day check helps prevent duplicate orders but in some cases some users may be required to do so - for example to stop a junior sales exec ordering too many full valets you can prevent them as duplicates but allow the department manager or senior sales exec to do so. You can also specify the codes which are restricted so that anyone can e.g. order a reclean. Go
You can specify which email addresses are always notified when a job for this department completes and also define specific optional email addresses to be notified. Go

13.4. Deleting a department Go
We do not recommend ever deleting a department, simply to ensure reliability of your data. If you do accidentally delete one, contact our support team. Go
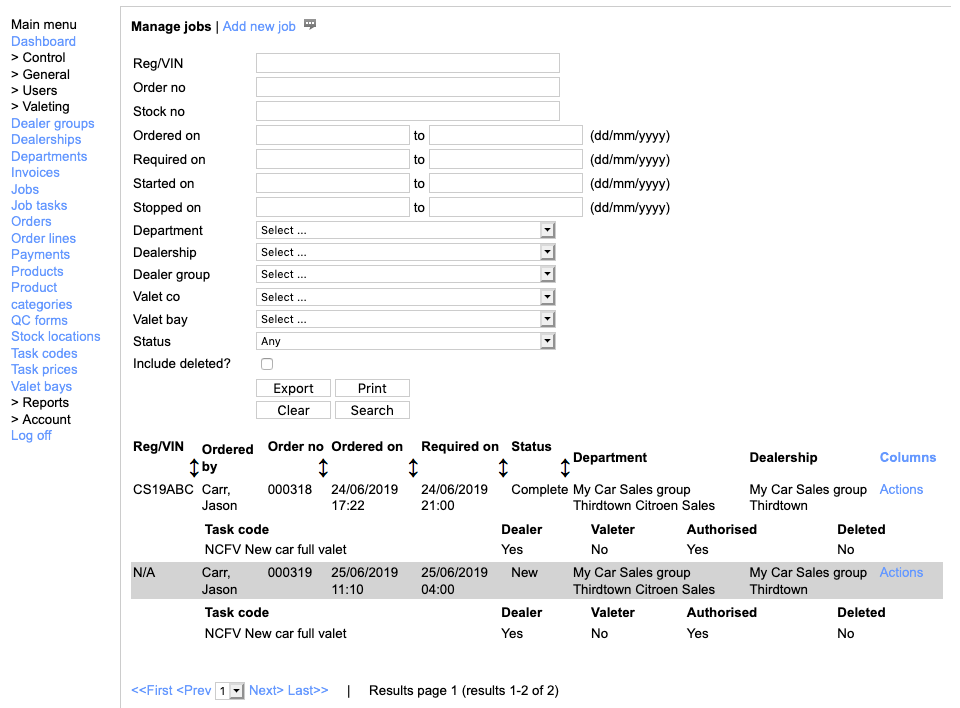
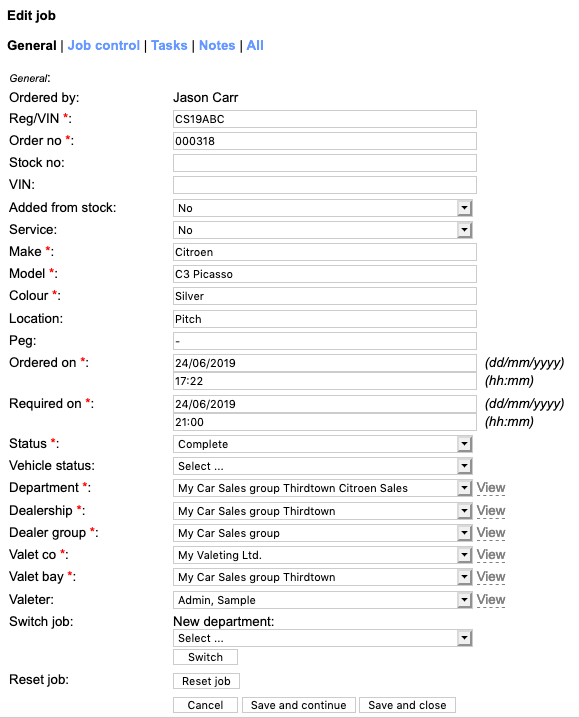
14. Managing jobs and job tasks Go
There are very few reeasons to ever edit a job or its tasks from your admin panel, but if you do need to, this is how. Go
Also in this section:
Editing a job14.1. Editing a job Go
The 'General' tab shows much of the information supplied when the job was added via the sales or valeter dashboard. Go
It also has options you might need in order to move the job from it's original department to a different one, or to reset the job to as if it had not been started or completed yet. Note that the 'Service' field shows whether the job was added by a service department or a different kind and is used in valeter dashboard filters to help them see sales orders from service orders if necessary Go
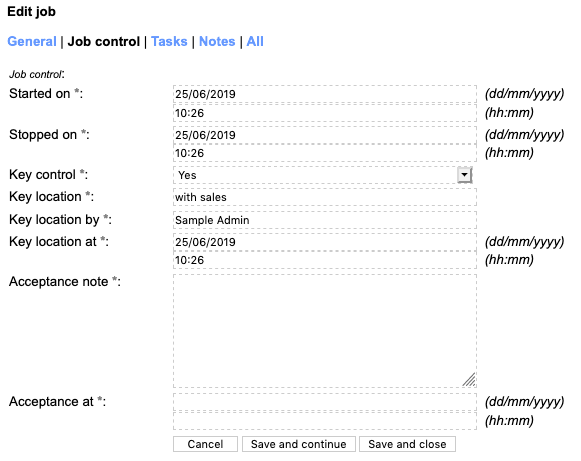
The 'Job control' tab shows you when the job started or stopped and who has said what about the key or accepting/rejecting the job. Go
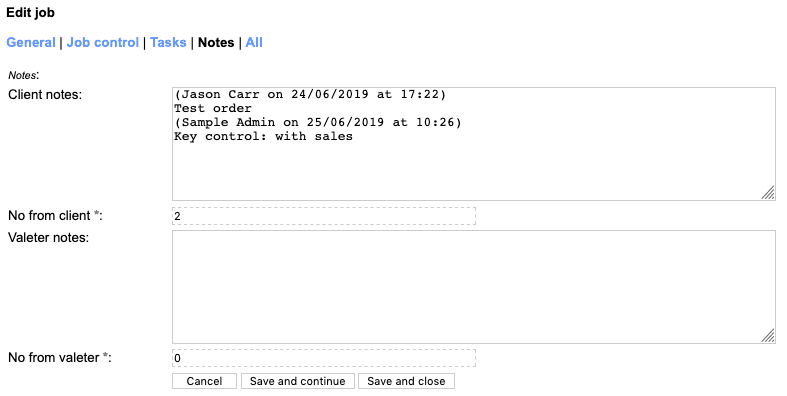
The 'Notes' tab shows you in one view the notes added by sales and by valeters. Go
15. Managing events and event job templates Go
ValetManager allows you to set up templates of jobs that are repeated week-to-week or month-to-month. Examples might be weekly site/pitch maintenance, recleans on demonstrators, cleaning the MD's car. These jobs are set up in what are termed events and event jobs. Go
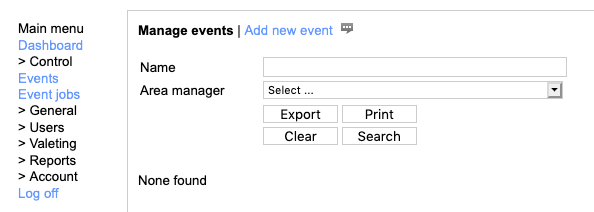
Fron the left-hand menu click 'Control | Events' and then you will see the above from which you can start to define a new event. Go
Click 'Add new event' and then fill-in the fields presented to you. Go
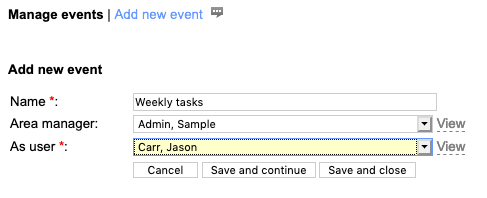
Here you are naming the event and then specifying which of your users or area managers is responsible to make sure it's done and which sales user the jobs are added on behalf of. Go
Now click 'Save and continue'. Go
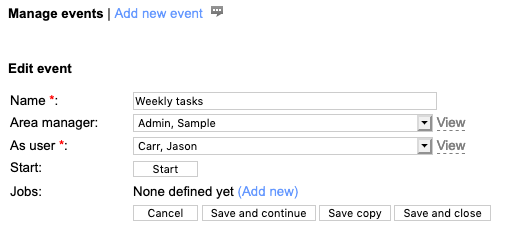
Right now, the event has no job templates to work with so click the '(Add new)' link to start your first one. Go
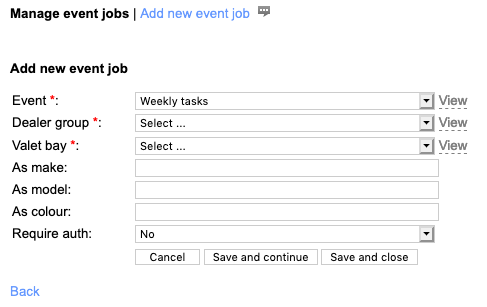
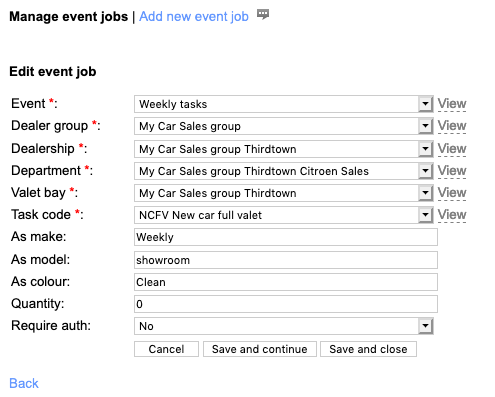
Select the dealer group, dealership, department and valet bay this templated job will happen at and also the task code you want to apply and then fill-in or select the make, model, colour the job will appear as. Note that you can use anything here such as 'Weekly', 'showroom' and 'clean' rather than actual vehicle details. Go
The field 'Require auth' determines whether a sales user needs to authorise the work once it's completed. This is useful if the volume of work such as number of vehicles cleaned might need review and agreement before it can be safely invoiced. Go

Now click 'Save and close' to return to the event definition. Go
Also in this section:
Editing an event or event job template15.1. Editing an event or event job template Go
In the grid of events you can see the events so-far defined and you can pick one to edit. Go
When you edit the event you see the fields you defined when you created it. Go

From here you can change the name or the assigned area manager or the sales user. You can also drill into one or other of the job templates in the event and edit that. Go
When you have finished editing the job template, click 'Save and close' to return to the event and then once you're done with that, click 'Save and close' or 'Cancel' to return to the list of events. Go
16. Managing products, categories and stock locations Go
You can use ValetManager to help valeters place orders for stock, consmables or equipment directly from within the system and these orders are sent by email to area managers or a central contact person who can then fulfil them from one or more stock locations. Go
This section explains that in some detail. Go
Also in this section:
About stock ordersManaging stock locations
Managing product categories
Managing products
16.1. About stock orders Go
A stock order can be placed by a valeter from their dashboard and this order can be for any categorised item you care to offer them. The order can be sent to the area manager and other staff users who can then act on the order. Go
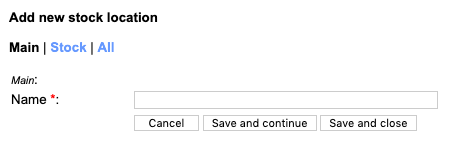
16.2. Managing stock locations Go
You can view or add or edit your stock location from the 'Valeting | Stock locations' left hand menu. Go
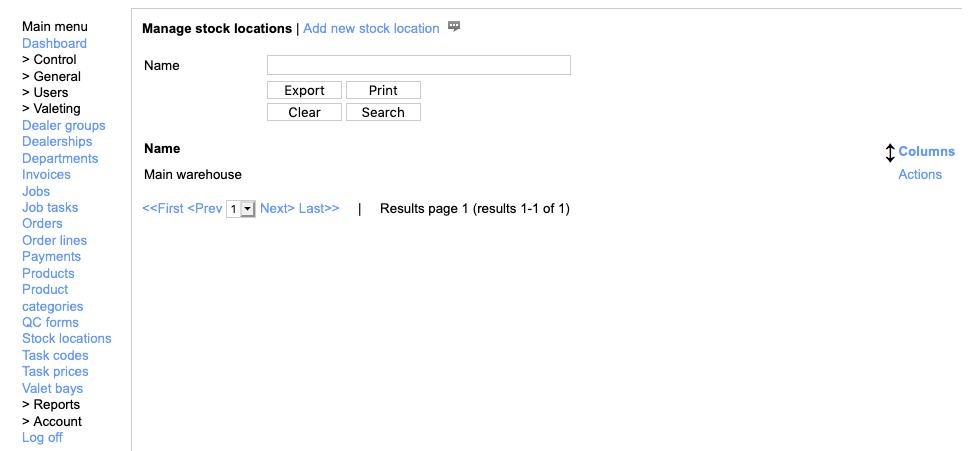
To add a stock location click 'Add stock location' and then enter a name for it. Go
16.3. Managing product categories Go
You can view or add or edit your product categories from the 'Valeting | Product categories' left hand menu. Go

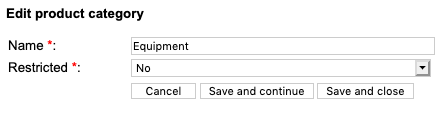
To add a product category click 'Add product category' and then enter a name for it. Also specify whether it is restricted or open for all users to order from. In the example above you will see that one category is called 'Corrosives' and is restricted. Go
16.4. Managing products Go
You can view or add or edit your products from the 'Valeting | Products' left hand menu. Go
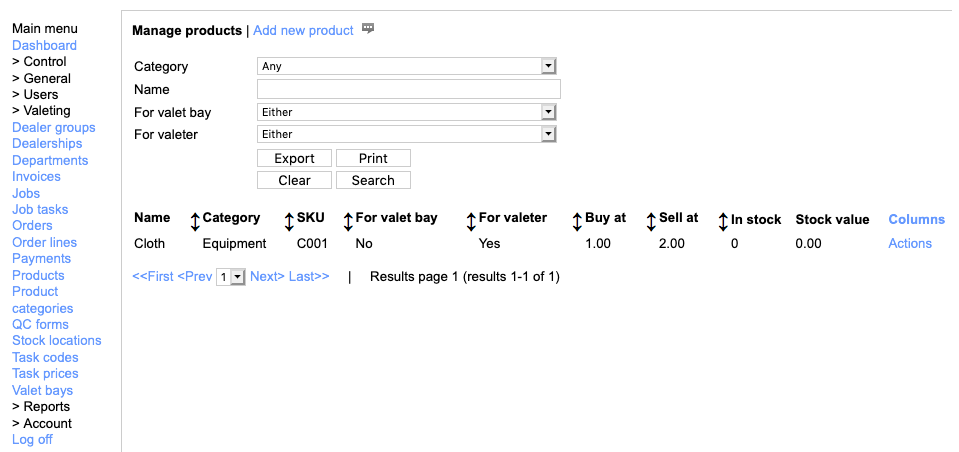
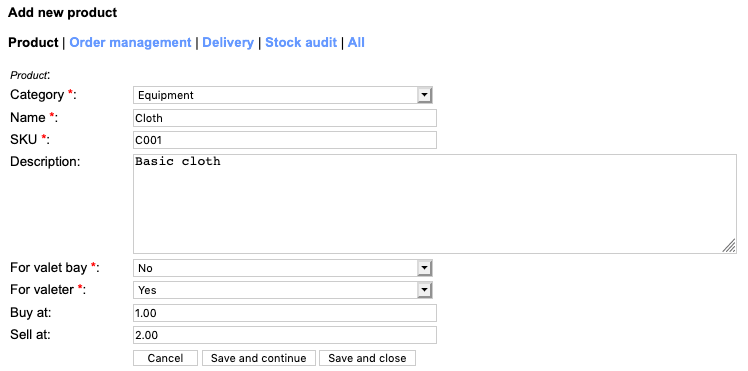
To add a product click 'Add product' and then enter a name for it. Select the category from those defined earlier and also a name and SKU to know it by. Identify whether it is personal for a valeter or is general to the whole bay and also enter the prices you buy and sell at. These can help you identify costs for running the bay and also amounts to invoice your self-employed subcontract valeters. Go
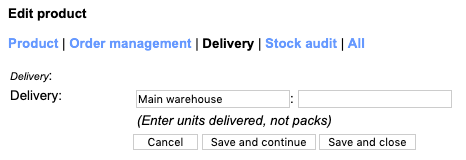
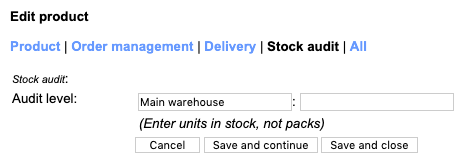
Once a product is in the system you can identify stock levels in each of your stock locations, the number of units in a pack which you order from the supplier and the re-order triggers and re-order quantities at each stock location. Go
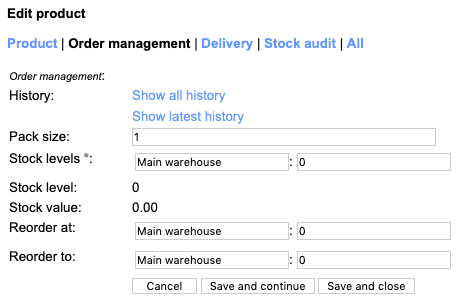
When you receive a delivery or do a stock audit you can record actual levels also: Go
17. Managing orders and order lines Go
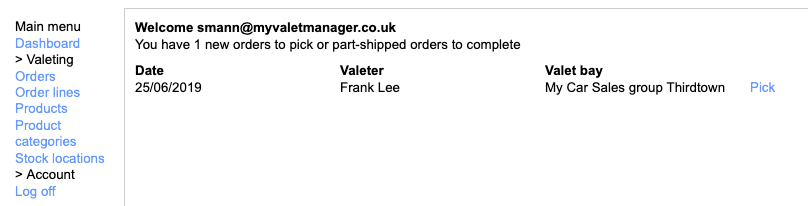
Orders are raised by valeters using their dashboard. When an order is available you can use the system to pick the order before dispatching it. There is a dedicated staff user role for this, StockManager anda user with thos role only has access to stock and order related items in the system. Go
When they log-in the they have a very focussed dashboard: Go
First of all, click the 'Pick' link next to the order you want to complete, then on the next screen select the stock location you are picking from. Go
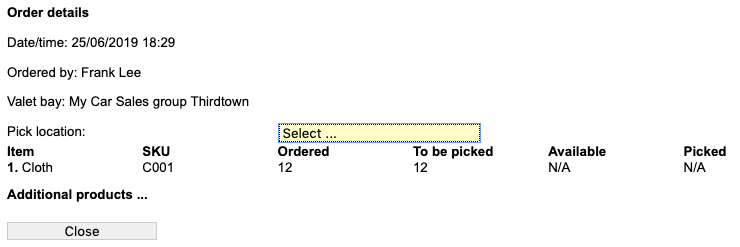
You can then enter the quantities of each you are planning to deliver and update the order by clicking 'Update - part ship' or 'Update - ship all lines'. Go
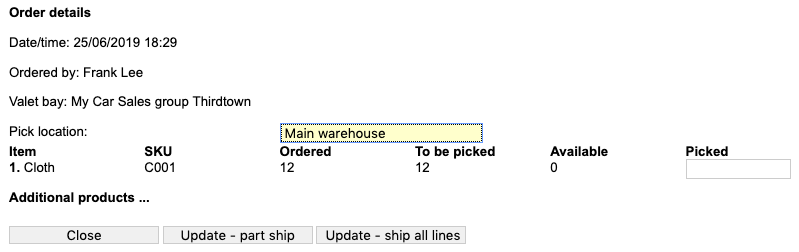
When the valeter receives the order they can check in the order which can help confirm the right quantity has made it to the bay. Go
18. Managing QC forms Go
This section presents an overview since this feature needs to be enabled on your subscription and you need the assistance of ValetManager support to build the templates. Go
Also in this section:
Completing QC formsViewing QC forms
18.1. Completing QC forms Go
ValetManager provides the following opportunities for quality control and/or health and safety: Go
- Go
- Valet bay quality / health and safety check by an area manager
- Valet bay quality / health and safety check by a valeting team leader
- Valet bay quality / health and safety check by a valeting area supervisor
- Valet bay daily quality / health and safety check by a valeter
- Job quality control check by an area manager
- Company vehicle quality control / health and safety check by an area manager
- Company vehicle quality control / health and safety check by a valeting team leader
- Monthly customer feedback
- Constant customer feedback
Different types of user provide their feedback at different times and in different ways but all follow the same process: Go
- Go
- A form is made available due to day of week / date of month
- User fills-in the form
- User optionally saves partially-completed form
- User completes and submits form
- Form is saved and then sent as PDF to the relevant email addresses
Checks by area managers are always available and the area manager can see the history of checks on a bay or vehicle before they start a new one, other simply become available in the dashboard menu. Monthly customer feedback forms can be seen when the user logs-in and the user has options to either complete the form immediately, come back to it, or a shortcut to say there is no feedback. Go
18.2. Viewing QC forms Go
As an admin user you can view any completed QC form within your dashboard, using the 'Valeting | QC forms' entry in the lef-hand menu. Go

When you view a QC form you can see values that indicate who completed it and about what, and also download the PDF version of the form. Go
19. Managing payments Go
Payments allow a means of recording a payment to a valeter or a credit note from a valeter outside of the standard self-invocing process. You might use it for additional payments or specific expenses. Go
Adding one from the dashboard was covered in Add valeter payment, but you can also add one from within 'Valeting | Payments' from the left-hand menu. Go
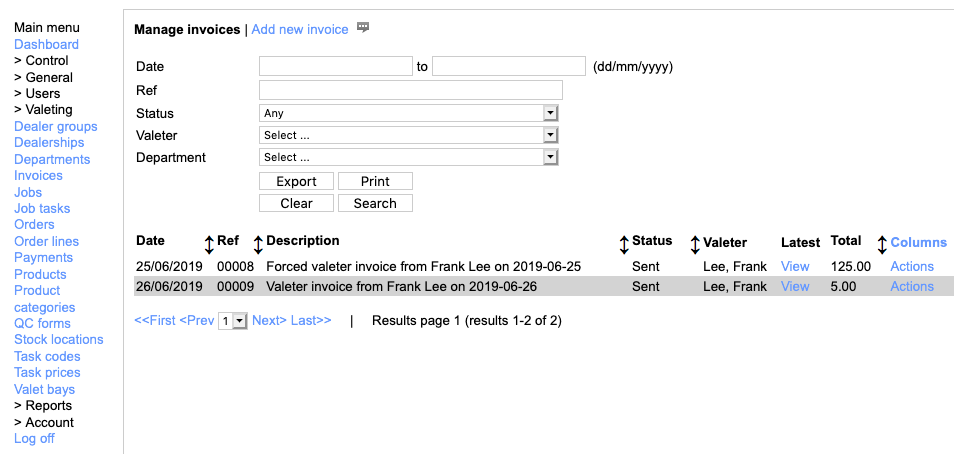
Once a payment is in the system you can view the PDF version of the invoice using the 'View' link. Go
You can also create a balancing credit note to reverse the payment by clicking the 'Reverse payment' button. This creates an additional entry which is a credit note. Go
20. Managing invoices Go
There are two kinds of invoice in ValetManager - invoices from you to the clients and invoices from subcontract valeters to you. Strictly, the first type are invoice advices but you can send them to clients if you want to. Go
These can both be seen in 'Valeting - Invoices' in the left-hand menu. Go
Also in this section:
Creating invoicesViewing invoices
20.1. Creating invoices Go
Invoices get created by valeters using their dashboard, if permitted, or on a weekly schedule (currently Saturday evening and Tuesday lunchtime). Invoices are also create when you or an area manager create a payment. You can create dealership invoices from your dashboard as described in Create dealership invoices. Go
20.2. Viewing invoices Go
From the list of invoices you can drill into one using 'Edit' in the 'Actions' menu in its row, or click 'Edit' in the quickview popup from clicking in its row. Go

There's not a lot you can do with an invoice but you can view or print the PDF version of it using the 'View and print' button, or you can download the PDF version by clicking the 'View' link next to the filename of the invoice under 'Printable'. Go
Additionally, if there has been an issue with your accounts user receiving the email, in addition to downloading it, you can also click the 'Regen and send PDF' button which will make a new PDF copy and email it. Go
21. Managing HR records Go
This section presents an overview since this feature needs to be enabled on your subscription and you need the assistance of ValetManager support to build the templates. Go
Also in this section:
How HR records workStarting an HR record
Completing an online contract
Reviewing and approving an HR record
21.1. How HR records work Go
When you add a valeter using your dashboard, a valeter account is created in the system and in parallel to this an HR record is also created ready to store personal information such as driving license details, right to work, etc. Go
An online contract and an online training record are also created ready to be filled-in by the area manager and the valeter together. The precise content and layout of these forms is defined by your valeting company with the ValetManager support team to ensure the right content is captured and it's right for you. Go
As these forms are completed, updates are sent to your HR manager ready for review and approval. Some of the information has review dates or expiry dates and as these approach, the hiring area manager is notified in time for the information being updated. Go
In order to complete a contract or a training record online, a security code is sent to the email address of the valeter and they have to enter this as a security measure to ensure the area manager has not simply completed the form by himself or herself. Go
If you have HR enabled in your subscription there are certain items of information about a valeter such as next of kin that you can only edit in the HR record or via an online form. This ensures that all accounts for the valeter are kept up to date at the same time. Go
21.2. Starting an HR record Go
If a valeter is added from your dashboard while you have HR records in your subscription, the necessary HR record is created automatically, but if you enable this later on, you can create such a record for an existing valeter using the 'Create HR information from this user' link in the 'Privacy and HR' tab of the user; Go
You will now be taken to the screen shown below in which you can enhance the information taken when you added the valeter account Go
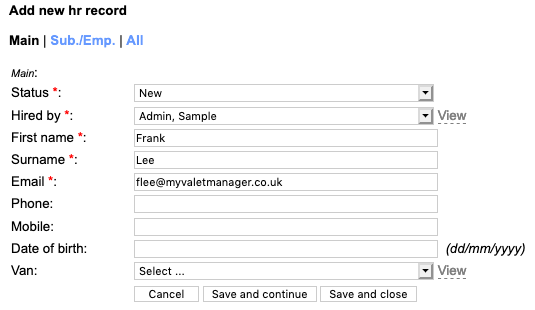
Click 'Save and close' when you're ready. Go
21.3. Completing an online contract Go
Whether you manually created the HR record or one was created when you added the valeter, you and the valeter can complete the online contract and training records from these links in the HR record. Go
If an area manager is doing this and they have restricted permissions, the links will appear within the valeter account record rather than in the actual related HR record. Go
21.4. Reviewing and approving an HR record Go
When it comes to reviewing and approving HR records, the information is split into these categories Go
Also in this subsection:
MainSubcontractor / employee
Induction
Driver's license
ID
Right to Work
Next of Kin
Documents
Forms
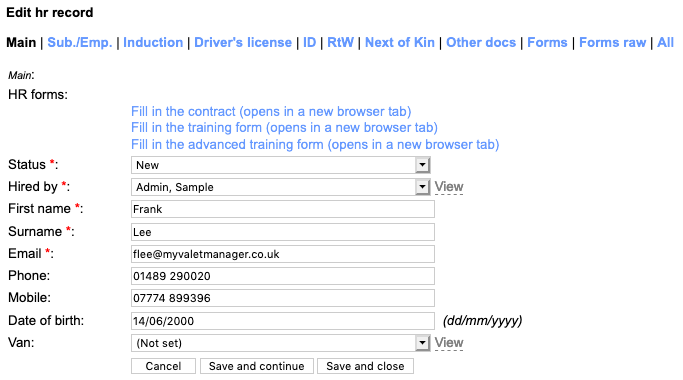
21.4.1. Main Go
On this tab you can review the common information such as name, contact details, line manager and also click links to edit any forms that are still open for editing (i.e. not yet fixed as approved). Go
Note that if the status on this tab is 'Approved' you cannot edit the contract, and it must be set to another status to allow it to be edited. Once the status is Approved you can instead edit an update form which is typically a cut-down version of the main contract form and suppies the same updates into the system. Go
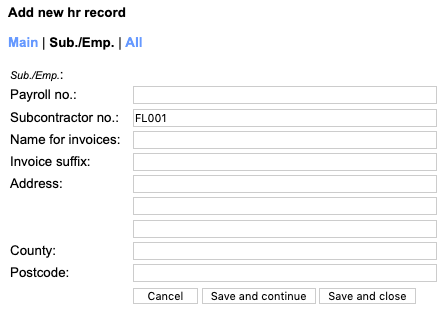
21.4.2. Subcontractor / employee Go
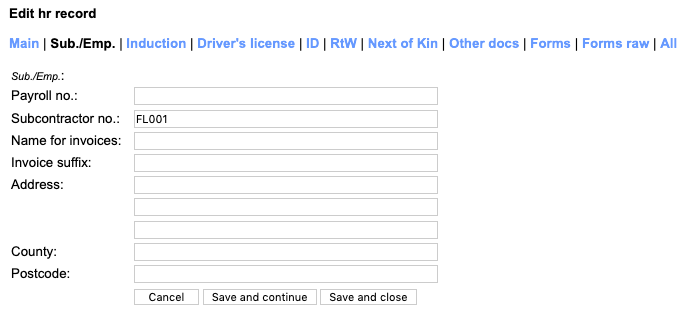
This tab includes fields such as employee or subcontractor number and address. Go
21.4.3. Induction Go
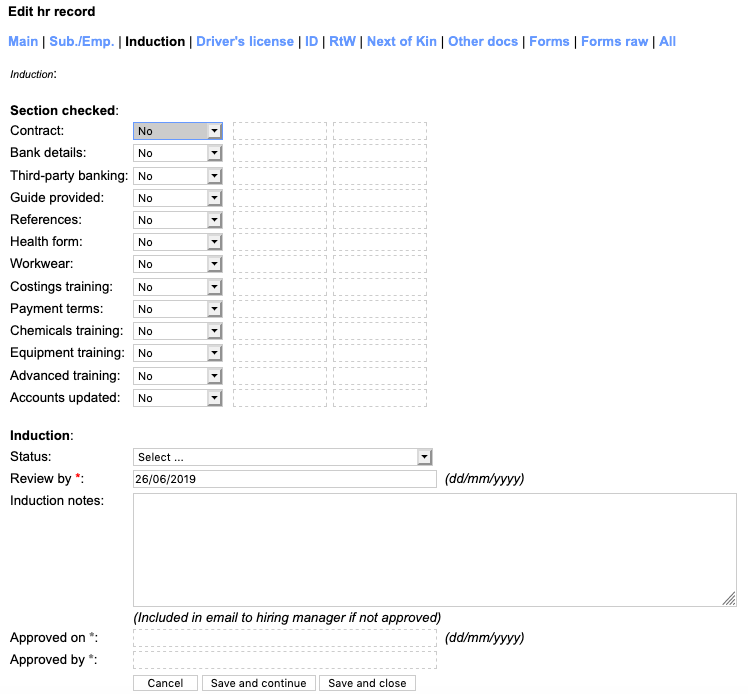
Use the rows in this to confirm that sections of the induction process have been completed. When you set one them to 'Yes'and then 'Save and close' or 'Save and continue', the row will also show who approved it and when. You can also set the overall status of the induction process and saving this will audit who approved it with when. Go
Note that if Training or Advanced trainng are set to Yes then the related form cannot be further edited online and you will need to change it to No to allow it to be re-edited. Go
21.4.4. Driver's license Go

This tab allows you to record details of the valeter's driving license and/or NI number. Use the 'Ref no.' field to save the license number. Use the 'Copy on file date' to record when you put a copy in a filing cabinet or when you uploaded scans or photos of the documents. Use the 'Add new' link under 'Scan' to upload images of the documents. If you set 'Expires on' the 'Notify from' field gets set to one month beforehand to give time for the system to notify the line manager who can take action. Go
21.4.5. ID Go
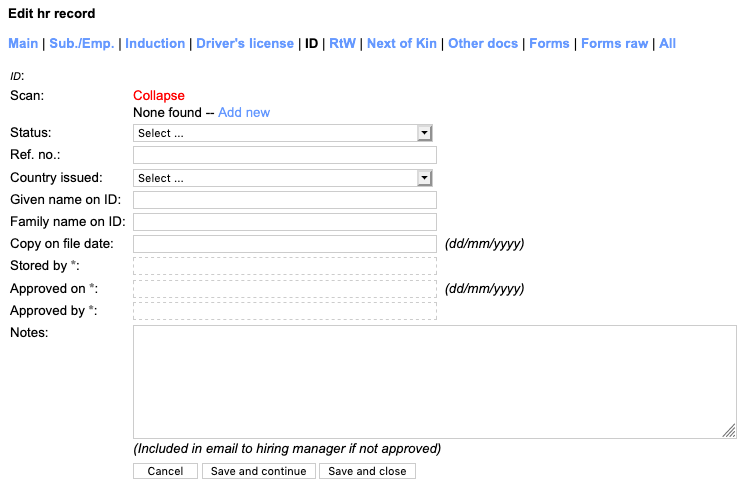
This tab allows you to note any formal ID document such as a national identity card if applicable. You can also capture the formal names from the ID which may differ from the names you know the valeter by day-by-day. As above, dates get set when you upload scans of documents or you can type in when you placed a copy in a fiing cabinet. Go
21.4.6. Right to Work Go

This tab allows you to record information about and actually upload images of any formal Right to Work document. As above, dates get set when you upload scans of documents or you can type in when you placed a copy in a fiing cabinet. Go
21.4.7. Next of Kin Go
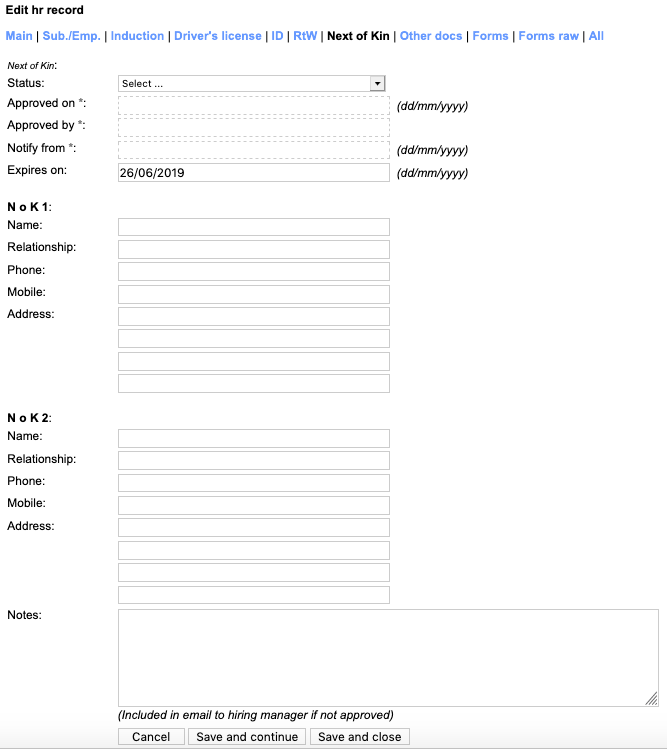
This tab allows you to store full contact details for up to two people to consider as next or kin, or at least emergency contact details. The expiry date for this is not as formal as the expiry date for other things, but can be used as a nudge to be refreshed one a year, for example. Go
21.4.8. Documents Go

This tab allows you to upload some other catgeories of document and to also see and download some of the PDF versions generated in the HR process. Go
21.4.9. Forms Go

This tab allows you to click to view or print contract and online training forms and you can see if the documents were authenticated by the valeter. Go
22. Managing company vehicles Go
Company vehicle records allow you to maintain a set of QC / health and safety records and to assign them to valeters. Go
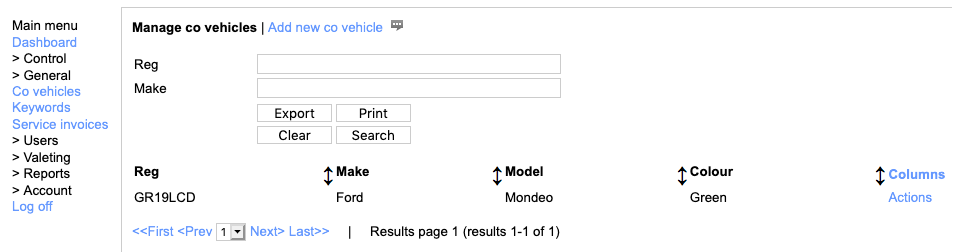
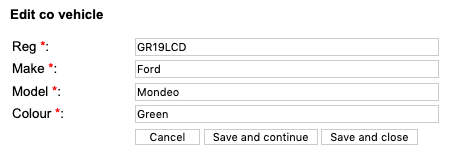
To add a new one, click the 'Add new co vehicle' link and complete the very simple fields show. Go
These vehicles can then be seleted from drop-downs such as when adding a QC form or when setting up a valeter account or HR record. Go
23. Managing service invoices Go
If you pay for your ValetManager subscription online with a credit card you can see and pay your invoices here. Go
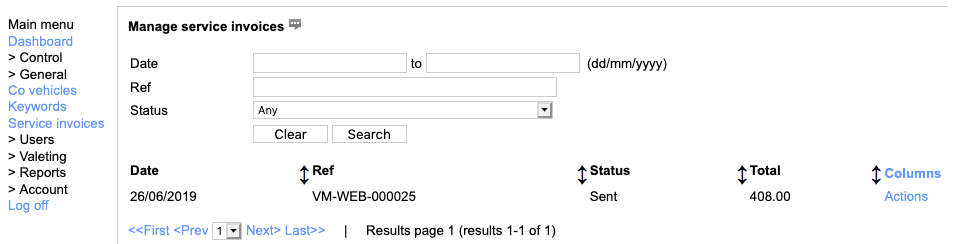
If you open one you can view the details about it and open it online. Go

You will have been sent this invoice by email and the email contains a link to pay it online. The invoice online looks like this. Go
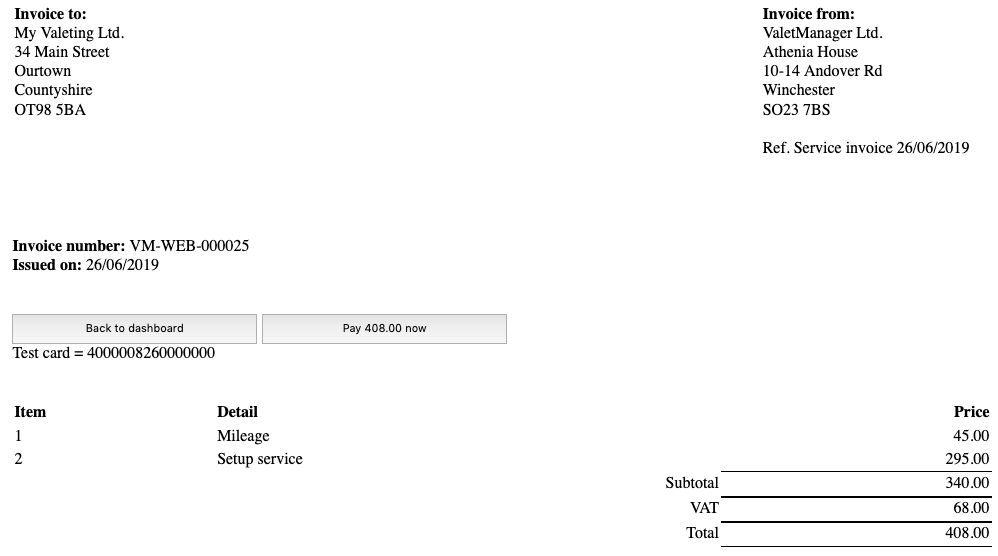
Click the 'Pay xx.xx now' button to pay this. Go
24. Reports Go
As an administrator for your valeting company you have various reports available to you. These are described in the next few sections. Go
Also in this section:
Department profit reportValeter profit report
Job task report
Lead time report
Duplicate job report
Valeter timesheet report
Force valeter invoices
24.1. Department profit report Go
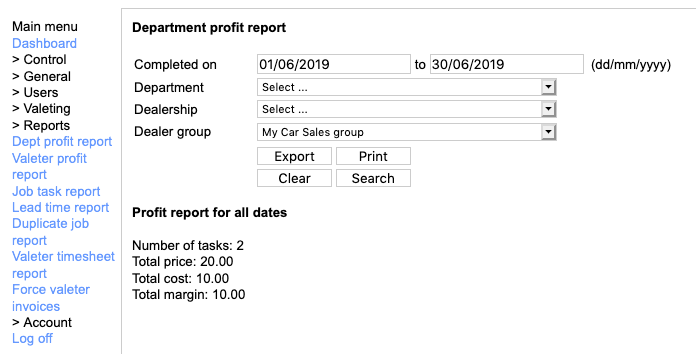
Use this report to work out turnover and costs for a selected dealer group or dealership or department across a specified date range. Go
24.2. Valeter profit report Go
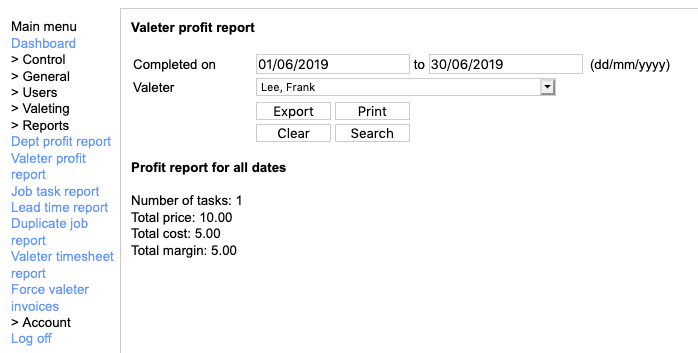
Use this report to show costs and revenues from a specified valeter in a period. Go
24.3. Job task report Go
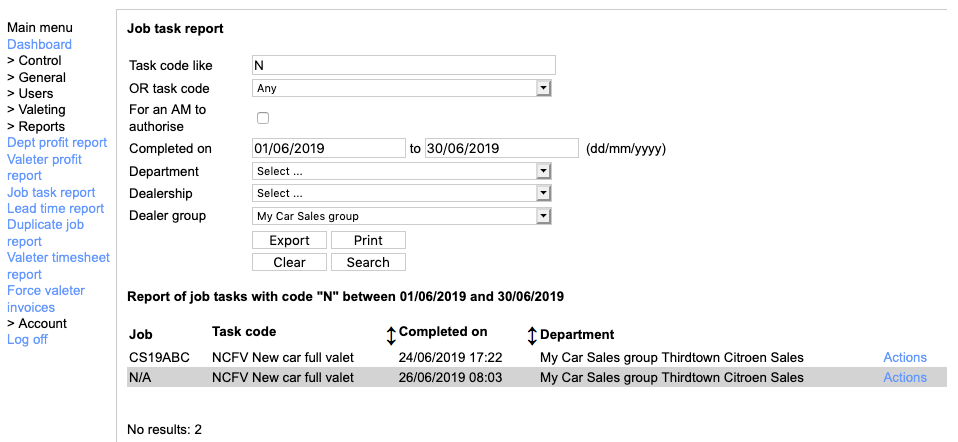
Use this report to show tasks performed in a certain date range for a specified dealer group, dealership or department. You can filter on a specific task code or for all codes that have a certain thing in their name. The example below reports on all tasks with 'N' in their code. You can drill into a line of the report to view the task in more detail if you want. Go
24.4. Lead time report Go
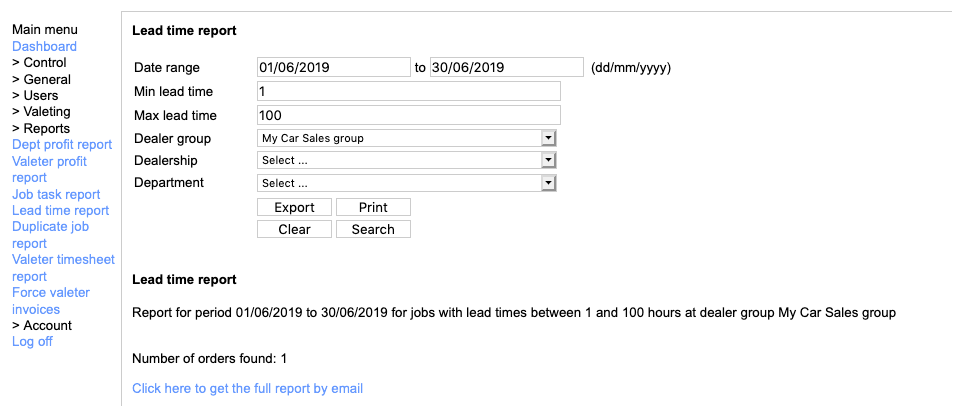
This report helps you identify where the dealership has perhaps ordered with a very short lead time. In the form, enter the date range to cover, the min and max lead time to report on (in hours) and filter by dealer group, dealership or department. Go
Click 'Search' to see a summary report with a link to click to send you the report by email. Go

The report is sent as a CSV attachment to an email and you can open it to see columns lke those below. Go

24.5. Duplicate job report Go
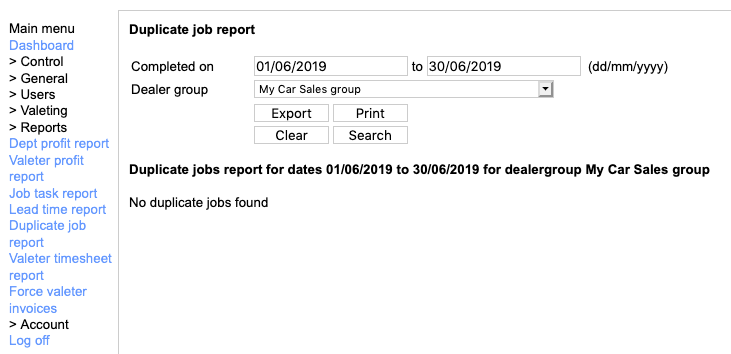
Even though the system goes to lengths to prevent duplicated orders, clients can force them through, so this report allows you to identify them in date range for a specified dealer group. Go
24.6. Valeter timesheet report Go
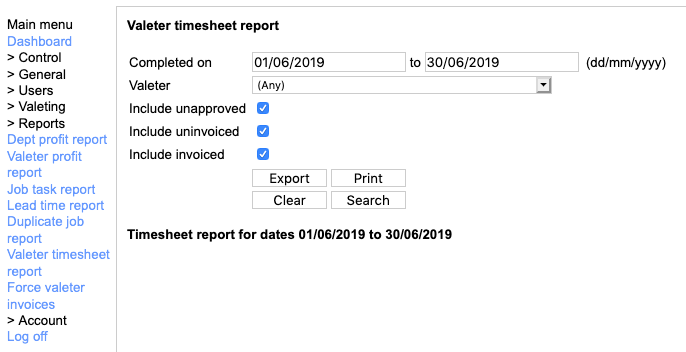
If you have valeters who clock in and out via ValetManager and then do all work on an hourly rate, this report can allow you to see the sessions which need approving or need invoicing or which have been invoiced. The report is based on the price of the hourly rate task price in place at the dealership and the hourly rate set up for the valeter. The report takes account of whether the session has been approved by a sales user and whether it has been invoiced in a self invoice or automatically. You should be able to use this report to assess your cost and turnover for the period. Go
24.7. Force valeter invoices Go
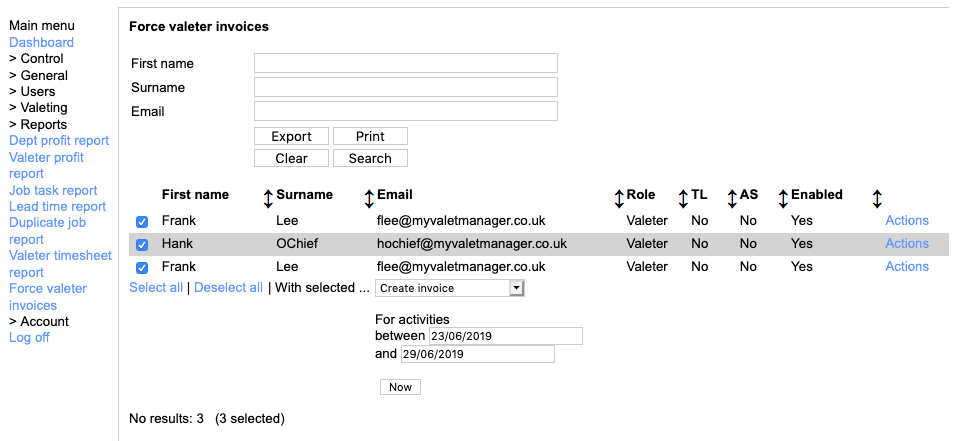
If your invoices from valeters are not automated and are not done by hand by the valeters within their dashboard logins, you can force them yourself. Go
Select the valeter ny name/email or just click 'Search' to see all. You can then tick the ones you want to force. Select the 'Create invoice' action and enter the date range to cover. When you click 'Now' you will be asked to confirm and then invoices will be generated and sent to you and the valeters. Go
25. Changing my details Go
You may or may not have permissions to edit users but either way, you can edit your own details here Go
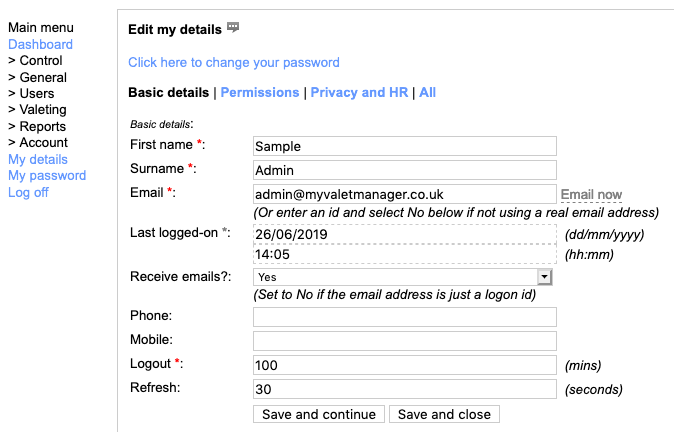
You can typically edit your name and email address, your other contact details. Click 'Save and continue' or 'Save and close' when you're done. Go
26. Changing my password Go
Here you can reset your password Go
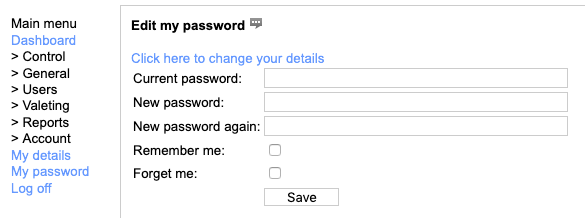
You will need to enter your current password and then your new one twice. If you want this logon to be remembered in this browser on this device, tick 'Remember me'. If you already have your user name remembered and don't want this to continue, tick 'Forget me'. Go
27. Personal information and data protection Go
Sales users and valeter users are asked on their first log-in to confirm the privacy policy. Go
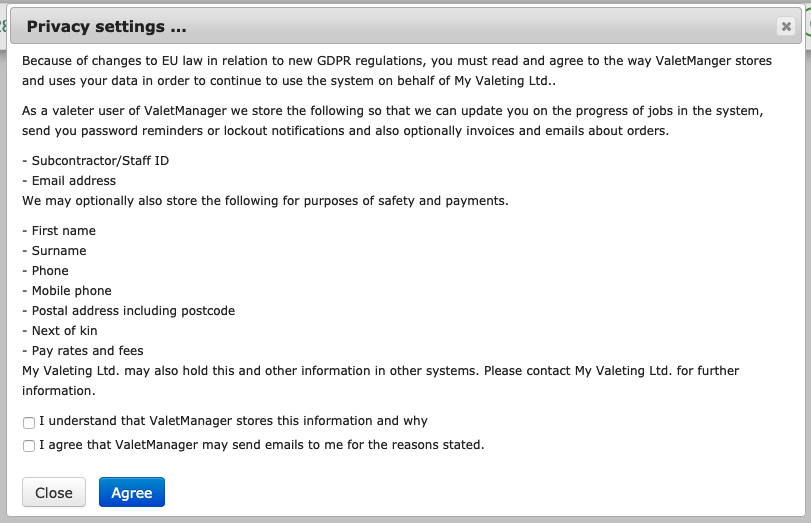
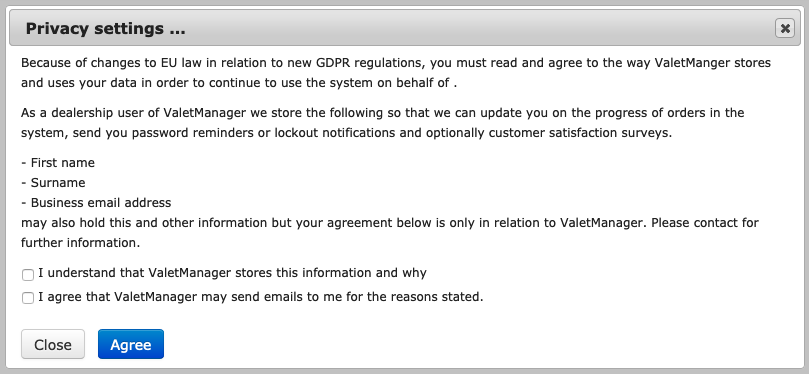
The system stores these ticks and honours them as best it can. Go
28. Contact us Go
This manual is intended to be comprehensive, but if you need further advice, please contact us as follows: Go
Email: admin@myvaletmanager.co.uk Go
Phone: 01489 290020 Go